
Установка bluetooth bmw e39
Добавил пользователь Дмитрий К. Обновлено: 19.09.2024
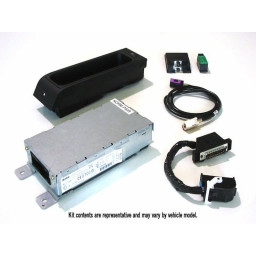
NOTE: Our Bluetooth Kits come with the latest Generation BMW ULF modules Available as shown in the BMW Compatibility matrix (and NOT the problematic first generation 84 21 954 552 others are selling, Be careful on getting older ULF modules as some people have had difficulties and incompatibilities with the old first generation ULF modules. Why use Our Bluetooth Solution?
Although detailed instructions will ship with your Bimmernav Retrofit kit The below Installation is a quick pictorial. This install instruction is just a reference and your installation may slightly vary. The process involves removing the old phone system in the trunk area and replacing with a BMW ULF Bluetooth Module (equipped with our unique bluetooth wiring harness), and removing the center center console phone cradle and replacing with the BMW OEM Bluetooth phone cradle. The CPT-3000-4000 Phone upgrade kits comes with one additional part to convert the LAN style adapter to ELO18 (not shown)
NOTE: ALWAYS disconnect BATTERY before working on the electrical system in a BMW. Most importantly, you should ensure that the navigation computer Power light is OFF before disconnecting your battery. BMW states that if the battery is disconnected when the navigation computer is on you may damage the nav computer. The important thing to keep in mind is do not disconnect the battery if the power light is on your navigation computer.
Tools required
Phillips head screw driver
8mm socket driver
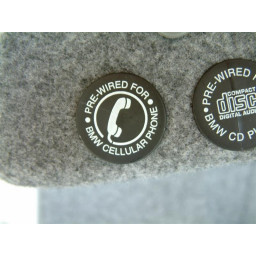
All North American BMWs even without BMW phone currently are already prewired for phone. You can verify by finding the Prewired for BMW Cellular phone in the trunk area. Prewiring consists of wiring for all telephone equipment, plus coding for phone and voice recognition. If your BMW is prewired for phone, and you install a new generation Bluetooth module, like we sell, it is highly unlikely that you will need to have your car coded.

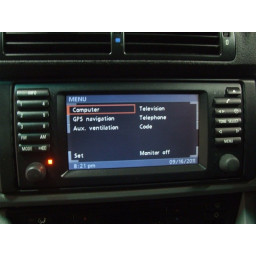
Installation videos of Bluetooth Retrofit Kit
Bluetooth Module Installation
Bluetooth Eject Box installation
Installing the BMW Microphone
Once installation is complete, you can pair your phone to your BMW.
Before starting remove the Bluetooth passkey sticker from the label of the BMW ULF control Module. Put this sticker someplace safe. I recommend putting this sticker under the oddment tray of the Eject kit for easy access when needed.
Step 1) If you do not currently have a phone system, you will need to insure that you have a microphone. If no mic is present, you will need to get a BMW microphone P/N 84 31 6 938 762. You can easily find out if you have a mic by shining a flashlight in the hole. If you can see right thru the holes you will need a mic.
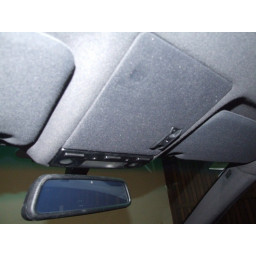
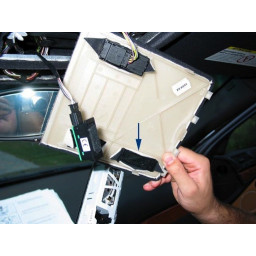
The Microphone is installed in the roof, where your light, universal garage door opener and sun-roof switches are located. It's easier to just pry the lights out with you bare hands, then slide the rest of the panel down towards the front of the car and pull it down. Note: Many people prefer the audio quality when the mic is mounted on the drivers side of the sun roof cover. Moving is the same process as installing the mic

There is a 3 pin black connector wire, plug it into the mic and then just snap the mic in place.
Step 2)
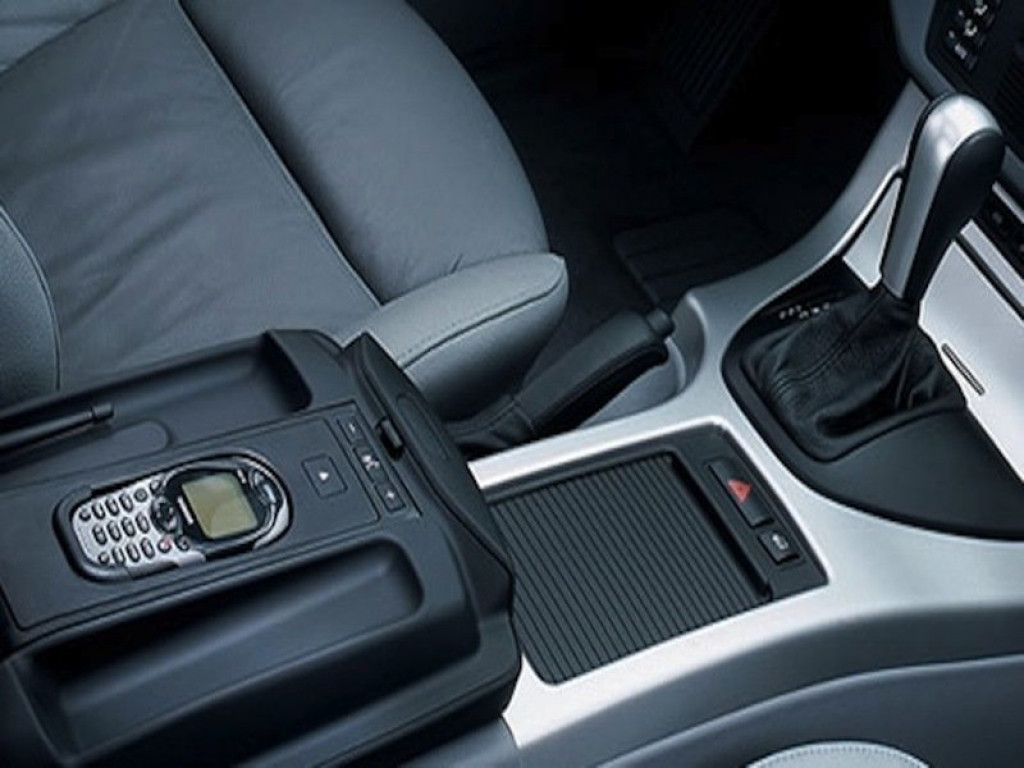
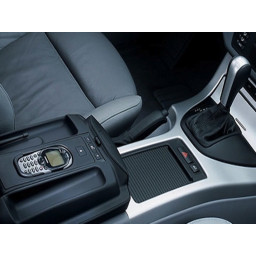
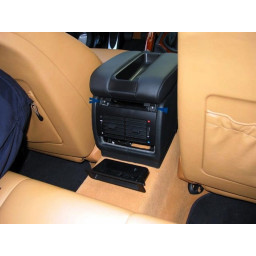
Taking the center arm-rest is easy. Insert your fingers into the small storage tray underneath the vents, and push up. Then just pull out the unit from the SIDE! I find pulling from the left side is easiest. Once the tray is removed slide the vents down, you'll see two screws. Unscrew those and get the whole arm-rest off and you'll see 3 wires. If you have the rear cupholders the removal process is similar. Just take a flexible credit card and gently pry out the edges.


If your car is built after 03/02 you will find a FAKRA antenna connector under the arm rest. If your car is built prior to 03/02, your Bluetooth antenna will be installed in the trunk area on the rear deck lid center where there is no metal to cover up the Bluetooth antenna between the cabin and the antenna.**** NOTE. BMW now recommends relocating the bluetooth antenna to the above location in BMW E39s built AFTER 03/02 if the bluetooth connection has low audio, or static. Relocating Bluetooth antenna It seems the original bluetooth antenna mounting location covers the antenna with quite a bit of metal and can decrease the antenna performance. Another option for relocating the antenna is under the storage just forward of the arm rest. You can mount the antenna under the storage compartment with double sided tape in the same area where the power wires are located in the early E39s.
The Eject box wiring in the early E39 (before 2001) is located just under the arm rest storage compartment. The storage compartment just pulls straight out and the wires are located on the passenger side of the rear air vent tubing.
I recommend plugging the antenna in before taping to the tray with double sided tape. There's only one wire there that will fit the antenna.

There are two tabs that hold the eject box in place, they are located on both sides and closer to the rear, pressing down on the tabs release the old eject kit . The easiest process to remove the old tray is to take two credit cards and insert them between the blank tray and the arm rest. Pressing the credit cards downwards Compare to the Bluetooth snap in adapter for an exact location. Just insert the credit cards in the location and the tabs will release. (pictures below show the X5, but the process is identical)


Once the old equipment is removed insert the Bluetooth Eject

Next, connect the two wires from the new tray with the remaining wires in the arm rest. Put it all back together to same way you took it apart, and you're done with the center console installation.

Step 3) First of all, locate a small sticker on the ULF module that says "BLUETOOTH PASSKEY". Stick onto some place safe. I personally like to press the button on the eject box to release the blank tray and put it underneath. You'll need this passkey to pair your phone with the car's system.
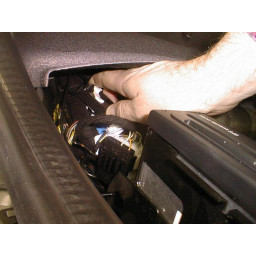
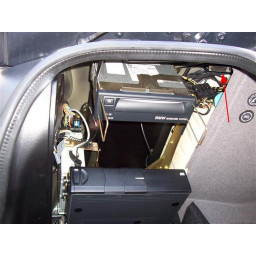
Open the electronics access area in the trunk of the E39 by lifting the cover down, in the same manner you would to change the CDs


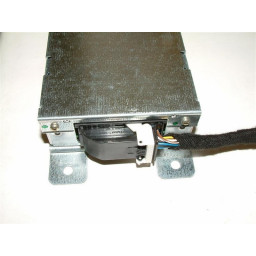
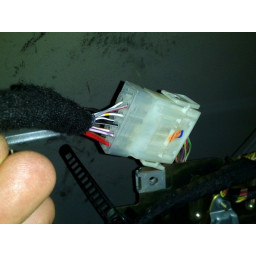
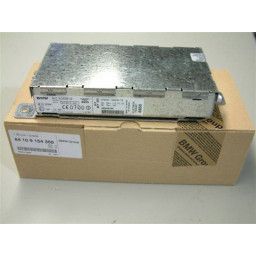
The Bluetooth connection needed is located around wheel well area. Locate the 54 pin connector for E39s built AFTER 03/02 OR the DB25 connector as shown in the top right hand corner of this picture. If your car is 03/02 production or higher connect this 54 pin harness directly to the ULF module, if your car has a manufacture date BEFORE 03/02 connect the DB25 connection to the ULF module using the DB25 to 54 pin adapter harness that comes with your kit.
Notes: In the same location that you find the phone connectors you may locate a three pin connector used for the optional cellphone booster (compensator), used to boost the signal if using snap in adapters, and either two or three other RF connectors Cream w/ purple colored (if 03/02 and higher) black w/ purple male and black with purple female. One of the black purple connectors, goes to the center console eject box to route the cellular phone in the optional snap in adapters, and the other would go to the BMW antenna (bumper mounted or roof mounted if equipped). You will not need to worry about either of these items unless you are using the snap in adapters to boost the signal to the car's antenna. When using the snap in adapters you can either connect the two RF cables together OR connect them together via the compensator for additional signal boosting. See Document for details. The cream colored antenna wire is for the Bluetooth antenna (if 03/02 and higher build date)
DB25 connector 54 Pin connector


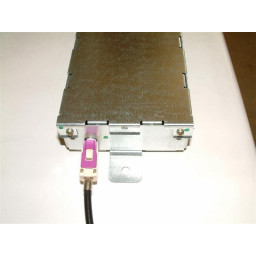
Connect the 54 pin connector to one end of the ULF module (using the provided adapter if e39 was built before 03/02), and the cream/purple colored Bluetooth antenna wire to the other end of the ULF module. PLEASE NOTE: I have heard from some customers that they had TWO Cream colored antenna wires. Make sure that you choose the Cream/Purple as shown in the below image.
Then you just slide the clips into their places (you'll see indentations on the mounting bracket that'll help you figure out how the clip is supposed to be put on). Don't plug in the CREAM COLORED FAKRA connector just yet, because it will be in your way of screwing one of the bolts in. At this point, if your car is a pre 03/02 production date, connect the Bluetooth antenna wire to the ULF module and find a suitable location for mounting the Bluetooth antenna. BMW recommends placing the antenna on the rear deck lid center where there is no metal to cover up the Bluetooth antenna between the cabin and the antenna.
If vehicle is a 2000 or higher and equipped with Voice recognition, you will need to remove the Voice recognition module and replace with the SES jumper plug cap See BMW Doc on SES jumper plugs . If your year 2000 or higher E39 does not have voice recognition although for some reason does not have the cap, you will need to install the SES jumper plus as well. See bottom of page for more info. The wire needed for this is in the same location as the previous two wires needed for the ULF module, it's a blue connector with a white bar. Slide the bar down, plug in the jumper, slide the bar up to secure it. If your car is equipped with voice recognition (SES) you will need to remove the SES module and replace with the jumper plug. The Bluetooth phone system has built in Bluetooth so you will no longer need this module.
SES module shown below needs to be removed
SES Jumper plug connected (connector may look slightly different on newer cars)
With the most up-to-date car stereo in your car, you can enjoy much fun and enjoyment on all trips. But how do I upgrade the old factory radio? Do I have to go to the stereo upgrade center or professionals to upgrade the radio? Absolutely not. In fact, you just need a step-by-step installation guide to learn the installation process. In here, I’d like to introduce a installation guide for a 1996-2003 BMW 5 Series E39 bluetooth dvd navigation system from Seicane to you. Wish you can get some help from that.

1996-2003 BMW 5 Series E39 bluetooth dvd navigation system after installation
Before and during installation, you should notice:
1.Before connecting, please make sure the ignition is off to avoid short circuit.
2.Ensure connect the yellow and red power cable at last.
3.Ensure that all loose wires are isolated with electrical tape
4.Ensure don’t tangle the wire when tighten the moving parts(Such as seat rails).
5.Ensure that all ground is connected to the same place.
1996-2003 BMW 5 Series E39 bluetooth dvd navigation system installation guide
1. Use a plastic trim tool to remove trim strip.

Use a plastic trim tool to remove trim strip
2. Remove screws marked by red arrows.

Remove screws marked by red arrows
3. Take out original DVD player of the car.

Take out original DVD player of the car
4. Pull out original power plug of the car.

Pull out original power plug of the car
5. Connect the power cables as the picture shows.

Connect the power cables as the picture shows
6. Remove screws in the spare tire in the trunk.

Remove screws in the spare tire in the trunk
7. Take out the spare tire.

Take out the spare tire
8. Remove four screws marked with red arrows.

Remove four screws marked with red arrows
9. Remove screws in triangle crutch.

Remove screws in triangle crutch
10. Take out triangle crutch.

Take out triangle crutch
11. Connect original plug of the car with power plug of DVD GPS.

Connect original plug of the car with power plug of DVD GPS
12. Check all the accessories for the new Seicane head unit.

Check all the accessories for the new Seicane head unit
13. Connect the harnesses to the back of the new Seicane head unit.

Connect the harnesses to the back of the new Seicane head unit
14. Connect the Seicane head unit to your original car radio ‘s plugs.
15. Turn on the new Seicane head unit to have a careful check if everything works well. If it doesn’t, please check whether all the cables are connected correctly.
16. Put the new Seicane head unit into the dash and install the four screws.
17. Install the trim panel into its original place.
All above is the detailed installation guide for a 1996-2003 BMW 5 Series E39 bluetooth dvd navigation system. If you don’t have any experience of installation or any problem with this guide, you can go to the dealer ask for help. Or arrange the professional to install it directly. In addition, you have to find the suitable car stereo for your car at first. Do you have the suitable car stereo? If you don’t have one, this multifunctional 1996-2003 BMW 5 Series E39 bluetooth dvd navigation system from Seicane is one of your best choice. You can click this link to check it:
With the most up-to-date intelligent pure android 5.1.1 operation system, you can count on its latest built-in 3D GPS and voice prompts to enter the correct direction of the destination. A variety of additional entertainment features can also bring you a wonderful and relaxing journey that you never ever had before. Wish you like it and enjoy the good time with it from now!
NOTE: Our Bluetooth Kits come with the latest Generation BMW ULF modules Available as shown in the BMW Compatibility matrix (and NOT the problematic first generation 84 21 954 552 others are selling, Be careful on getting older ULF modules as some people have had difficulties and incompatibilities with the old first generation ULF modules. Why use Our Bluetooth Solution?
Although detailed instructions will ship with your Bimmernav Retrofit kit The below Installation is a quick pictorial. This install instruction is just a reference and your installation may slightly vary. The process involves removing the old phone system in the trunk area and replacing with a BMW ULF Bluetooth Module (equipped with our unique bluetooth wiring harness), and removing the center center console phone cradle and replacing with the BMW OEM Bluetooth phone cradle. The CPT-3000-4000 Phone upgrade kits comes with one additional part to convert the LAN style adapter to ELO18 (not shown)
NOTE: ALWAYS disconnect BATTERY before working on the electrical system in a BMW. Most importantly, you should ensure that the navigation computer Power light is OFF before disconnecting your battery. BMW states that if the battery is disconnected when the navigation computer is on you may damage the nav computer. The important thing to keep in mind is do not disconnect the battery if the power light is on your navigation computer.
Tools required
Phillips head screw driver
8mm socket driver
All North American BMWs even without BMW phone currently are already prewired for phone. You can verify by finding the Prewired for BMW Cellular phone in the trunk area. Prewiring consists of wiring for all telephone equipment, plus coding for phone and voice recognition. If your BMW is prewired for phone, and you install a new generation Bluetooth module, like we sell, it is highly unlikely that you will need to have your car coded.
Installation videos of Bluetooth Retrofit Kit
Bluetooth Module Installation
Bluetooth Eject Box installation
Installing the BMW Microphone
Once installation is complete, you can pair your phone to your BMW.
Before starting remove the Bluetooth passkey sticker from the label of the BMW ULF control Module. Put this sticker someplace safe. I recommend putting this sticker under the oddment tray of the Eject kit for easy access when needed.
Step 1) If you do not currently have a phone system, you will need to insure that you have a microphone. If no mic is present, you will need to get a BMW microphone P/N 84 31 6 938 762. You can easily find out if you have a mic by shining a flashlight in the hole. If you can see right thru the holes you will need a mic.
The Microphone is installed in the roof, where your light, universal garage door opener and sun-roof switches are located. It's easier to just pry the lights out with you bare hands, then slide the rest of the panel down towards the front of the car and pull it down. Note: Many people prefer the audio quality when the mic is mounted on the drivers side of the sun roof cover. Moving is the same process as installing the mic
There is a 3 pin black connector wire, plug it into the mic and then just snap the mic in place.
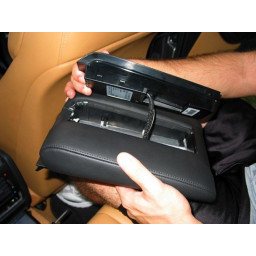
Step 2)
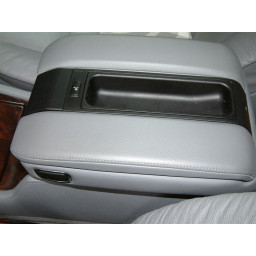
Taking the center arm-rest is easy. Insert your fingers into the small storage tray underneath the vents, and push up. Then just pull out the unit from the SIDE! I find pulling from the left side is easiest. Once the tray is removed slide the vents down, you'll see two screws. Unscrew those and get the whole arm-rest off and you'll see 3 wires. If you have the rear cupholders the removal process is similar. Just take a flexible credit card and gently pry out the edges.
If your car is built after 03/02 you will find a FAKRA antenna connector under the arm rest. If your car is built prior to 03/02, your Bluetooth antenna will be installed in the trunk area on the rear deck lid center where there is no metal to cover up the Bluetooth antenna between the cabin and the antenna.**** NOTE. BMW now recommends relocating the bluetooth antenna to the above location in BMW E39s built AFTER 03/02 if the bluetooth connection has low audio, or static. Relocating Bluetooth antenna It seems the original bluetooth antenna mounting location covers the antenna with quite a bit of metal and can decrease the antenna performance. Another option for relocating the antenna is under the storage just forward of the arm rest. You can mount the antenna under the storage compartment with double sided tape in the same area where the power wires are located in the early E39s.
The Eject box wiring in the early E39 (before 2001) is located just under the arm rest storage compartment. The storage compartment just pulls straight out and the wires are located on the passenger side of the rear air vent tubing.
I recommend plugging the antenna in before taping to the tray with double sided tape. There's only one wire there that will fit the antenna.
There are two tabs that hold the eject box in place, they are located on both sides and closer to the rear, pressing down on the tabs release the old eject kit . The easiest process to remove the old tray is to take two credit cards and insert them between the blank tray and the arm rest. Pressing the credit cards downwards Compare to the Bluetooth snap in adapter for an exact location. Just insert the credit cards in the location and the tabs will release. (pictures below show the X5, but the process is identical)
Once the old equipment is removed insert the Bluetooth Eject
Next, connect the two wires from the new tray with the remaining wires in the arm rest. Put it all back together to same way you took it apart, and you're done with the center console installation.
Step 3) First of all, locate a small sticker on the ULF module that says "BLUETOOTH PASSKEY". Stick onto some place safe. I personally like to press the button on the eject box to release the blank tray and put it underneath. You'll need this passkey to pair your phone with the car's system.
Open the electronics access area in the trunk of the E39 by lifting the cover down, in the same manner you would to change the CDs
The Bluetooth connection needed is located around wheel well area. Locate the 54 pin connector for E39s built AFTER 03/02 OR the DB25 connector as shown in the top right hand corner of this picture. If your car is 03/02 production or higher connect this 54 pin harness directly to the ULF module, if your car has a manufacture date BEFORE 03/02 connect the DB25 connection to the ULF module using the DB25 to 54 pin adapter harness that comes with your kit.
Notes: In the same location that you find the phone connectors you may locate a three pin connector used for the optional cellphone booster (compensator), used to boost the signal if using snap in adapters, and either two or three other RF connectors Cream w/ purple colored (if 03/02 and higher) black w/ purple male and black with purple female. One of the black purple connectors, goes to the center console eject box to route the cellular phone in the optional snap in adapters, and the other would go to the BMW antenna (bumper mounted or roof mounted if equipped). You will not need to worry about either of these items unless you are using the snap in adapters to boost the signal to the car's antenna. When using the snap in adapters you can either connect the two RF cables together OR connect them together via the compensator for additional signal boosting. See Document for details. The cream colored antenna wire is for the Bluetooth antenna (if 03/02 and higher build date)
DB25 connector 54 Pin connector
Connect the 54 pin connector to one end of the ULF module (using the provided adapter if e39 was built before 03/02), and the cream/purple colored Bluetooth antenna wire to the other end of the ULF module. PLEASE NOTE: I have heard from some customers that they had TWO Cream colored antenna wires. Make sure that you choose the Cream/Purple as shown in the below image.
Then you just slide the clips into their places (you'll see indentations on the mounting bracket that'll help you figure out how the clip is supposed to be put on). Don't plug in the CREAM COLORED FAKRA connector just yet, because it will be in your way of screwing one of the bolts in. At this point, if your car is a pre 03/02 production date, connect the Bluetooth antenna wire to the ULF module and find a suitable location for mounting the Bluetooth antenna. BMW recommends placing the antenna on the rear deck lid center where there is no metal to cover up the Bluetooth antenna between the cabin and the antenna.
If vehicle is a 2000 or higher and equipped with Voice recognition, you will need to remove the Voice recognition module and replace with the SES jumper plug cap See BMW Doc on SES jumper plugs . If your year 2000 or higher E39 does not have voice recognition although for some reason does not have the cap, you will need to install the SES jumper plus as well. See bottom of page for more info. The wire needed for this is in the same location as the previous two wires needed for the ULF module, it's a blue connector with a white bar. Slide the bar down, plug in the jumper, slide the bar up to secure it. If your car is equipped with voice recognition (SES) you will need to remove the SES module and replace with the jumper plug. The Bluetooth phone system has built in Bluetooth so you will no longer need this module.
SES module shown below needs to be removed
SES Jumper plug connected (connector may look slightly different on newer cars)
07.07.2017
Руководство по установке системы громкой связи Bluetooth Bluetooth на BMW E39 5 серии 1997-2003 гг. Видео о работе Bluetooth в BMW E39 .
Шаг 1
Первым шагом в любом обновлении BMW является определение некоторых базовых деталей. В то время как любой BMW E39 может быть дооснащен, чтобы включить Bluetooth Bluetooth Hands-Free и систему голосового управления. Эти детали позволят вам избежать любых неприятных ошибок
1) Дата сборки BMW. Вы можете найти номер VIN вашего автомобиля и посмотреть его с помощью онлайн-декодера VIN или найти код с датой сборки, который можно найти на некоторых табличках с номерами VIN. (Вверху справа на фото)

Шаг 2
2) BMW предварительно подключен к телефону. Все североамериканские BMW E39 предварительно подключены к телефону, но некоторые евро и другие регионы BMW E39 могут не подключаться к телефону. Опция быстрой проверки заключается в том, чтобы посмотреть на панель, где расположены верхние фонари, и определить, есть ли у вас микрофонная часть.
Фото 1 Нет микрофона. - Автомобиль скорее всего НЕ предустановлен на телефон
Фото 2 Предустановлено для телефона. Фото показывает панель снята со стрелкой, указывающей в сторону задней части обивки микрофона
Шаг 3
Конкретные детали, необходимые для вашей установки, будут зависеть от даты сборки и выбранных опций монтажа.
Содержимое комплекта Bluetooth может отличаться, но все используют модуль BMW ULF. Модуль ULF - это модуль громкой связи и голосового управления BMW Bluetooth. - Получить последнюю версию модуля, доступного для поддержки новейших типов телефонов Bluetooth.
Шаг 4
Начиная с задней части автомобиля, подключите модуль Bluetooth. Модуль будет подключаться напрямую к проводке в автомобиле в зависимости от конфигурации телефона вашего модельного года и телефонной проводки.
Более новые BMW E39s, начиная с марта 2002 года, серийные автомобили будут иметь 54-контактный телефонный разъем, который подключается непосредственно к модулю Bluetooth.
Старые BMW будут иметь разные разъемы проводки, если они предварительно подключены к телефону, или разъем проводки телефона, если они не подключены заранее для телефона.
Шаг 5
Все североамериканские BMW E39 серии 5 предварительно подключены к телефону, в то время как для некоторых автомобилей BMW в Европе и других странах не предусмотрена возможность подключения телефона.
Если ваш E39 не подключен к телефону, E39 просто потребуется специальный жгут проводов, который подключается к разъему питания телефона в задней части автомобиля.
Шаг 6
Установите модуль Bluetooth в свой BMW - с новым кронштейном BMW или, если ваш BMW E39 - модель 2003 года и предварительно подключен к телефону в кронштейне, который уже установлен в вашем автомобиле.
Подсоедините антенну Bluetooth к модулю управления ULF Bluetooth и установите антенну Bluetooth в том месте, которое соответствует простым инструкциям вашего установочного комплекта Bluetooth.

Шаг 7
Если ваш BMW не был оснащен установленной на заводе телефонной системой, вам необходимо установить микрофон BMW для использования с вашей системой Bluetooth Bluetooth
Чтобы установить микрофон, просто снимите накладную панель накладной консоли и подключите микрофон BMW к разъему в автомобиле и прикрепите его к внутренней стороне накладки в месте установки микрофона.

Шаг 8
Если ваш BMW предварительно подключен к телефону, вам необходимо подключить извлекающую коробку Bluetooth Bluetooth, которая используется для сопряжения телефона и зарядки телефона с помощью дополнительных зарядных устройств для зарядки телефона с помощью защелкивающегося адаптера BMW.
Чтобы вынуть пустой подлокотник, вставьте и замените его на ящик для извлечения, просто снимите отсек для хранения под вентиляционными отверстиями для задних пассажиров.
Слегка сдвиньте вентиляционное отверстие, чтобы открыть два винта с крестообразным шлицем
Шаг 9
Снимите часть подлокотника, осторожно сдвинув подлокотник вперед. Отсоедините пустой лоток и замените его на ящик для извлечения BMW с кнопкой подключения телефона
Если ваш BMW был изготовлен после производства в марте 2002 года, антенна Bluetooth будет установлена под этим подлокотником в указанном месте
Защелкните новую коробку извлечения на месте и подключите к заводским разъемам проводки под подлокотником в верхней части пластиковой панели. Если ваша BMW была выпущена в 2002 году или ранее, разъемы находятся под пластиковой накладкой в нижней части отсека.


Шаг 10
По завершении нажмите и удерживайте кнопку на лицевой панели (кнопку сопряжения) на блоке извлечения при включении зажигания. Через 3-5 секунд после включения зажигания отпустите кнопку, чтобы начать процесс подключения телефона
Найдите в своем мобильном телефоне устройства Bluetooth и выберите BMW ULF. Используйте уникальный пароль Bluetooth, расположенный на боковой стороне модуля Bluetooth, для сопряжения телефона
После завершения система отключится от вашего телефона, чтобы вы могли подключить до 4 телефонов одновременно с вашей системой. Последний подключенный телефон имеет самый высокий приоритет
Шаг 11
После того, как ваш телефон подключен, вы можете выключить зажигание, чтобы сохранить ваши настройки, и при следующем включении автомобиля вы сможете использовать систему громкой связи с пульта управления на рулевом колесе, радио или навигационного дисплея.
Нажатие и удерживание кнопок FACE в автомобиле активирует голосовое управление, а кратковременное нажатие кнопок FACE или PHONE позволяет отправлять или завершать вызовы. Элементы управления на рулевом колесе также можно использовать для просмотра телефонных книг и других настроек телефона.
Шаг 12
Bluetooth-система BMW также работает с автомобилями, оснащенными радио / кассетными плеерами и радио / CD плеерами.
Читайте также: