
Распиновка магнитолы clarion dxz585usb
Добавил пользователь Дмитрий К. Обновлено: 19.09.2024
Наша цель - обеспечить Вам самый быстрый доступ к руководству по эксплуатации устройства Clarion DXZ585USB . Пользуясь просмотром онлайн Вы можете быстро просмотреть содержание и перейти на страницу, на которой найдете решение своей проблемы с Clarion DXZ585USB .
Для Вашего удобства
Если просмотр руководства Clarion DXZ585USB непосредственно на этой странице для Вас неудобен, Вы можете воспользоваться двумя возможными решениями:
- Полноэкранный просмотр -, Чтобы удобно просматривать инструкцию (без скачивания на компьютер) Вы можете использовать режим полноэкранного просмотра. Чтобы запустить просмотр инструкции Clarion DXZ585USB на полном экране, используйте кнопку Полный экран .
- Скачивание на компьютер - Вы можете также скачать инструкцию Clarion DXZ585USB на свой компьютер и сохранить ее в своем архиве. Если ты все же не хотите занимать место на своем устройстве, Вы всегда можете скачать ее из ManualsBase.
Печатная версия
Многие предпочитают читать документы не на экране, а в печатной версии. Опция распечатки инструкции также предусмотрена и Вы можете воспользоваться ею нажав на ссылку, находящуюся выше - Печатать инструкцию . Вам не обязательно печатать всю инструкцию Clarion DXZ585USB а только некоторые страницы. Берегите бумагу.
Резюме
Ниже Вы найдете заявки которые находятся на очередных страницах инструкции для Clarion DXZ585USB . Если Вы хотите быстро просмотреть содержимое страниц, которые находятся на очередных страницах инструкции, Вы воспользоваться ими.
Краткое содержание страницы № 1
Краткое содержание страницы № 2
English This equipment has been tested and found to comply with the limits for a Class B digital device, pursuant to Part 15 of the FCC Rules. These limits are designed to provide reasonable protection against harmful interference in a residential installation. This equipment generates, uses, and can radiate radio frequency energy and, if not installed and used in accordance with the instructions, may cause harmful interference to radio communications. However, there is no guarantee that in
Краткое содержание страницы № 3
Краткое содержание страницы № 4
English 1.FEATURES • 6ch/6V RCA Output / 53W ✕ 4 Built-in MOSFET Amplifier ® • USB Audio for iPod • USB Digital Media Streaming Capability ∗ “iPod” is for legal or rightholder-authorized copying only. Don’t steal music. “iPod” is a trademark of Apple Inc., registered in the U.S. and other countries. ∗ XM and the XM logos are trademarks of XM Satellite Radio Inc. 2. PRECAUTIONS 1. When the inside of the car is very cold and CAUTION the player is used soon after switching on the heater moisture
Краткое содержание страницы № 5
English Flip Down Panel 3. Do not use the FLIP DOWN PANEL as a tray 5. Strong impacts to the operating or display to place objects on when it is open. section can cause damage or deformation. 4. When closing the FLIP DOWN PANEL, do 6. If the FLIP DOWN PANEL does not open not press the [OPEN] button. fully, gently open it with your hand. ∗ Press the center of the DCP to close. DCP Handling Compact Discs Use only compact discs bearing the or of such discs may cause misoperation or damage. mar
Краткое содержание страницы № 6
Краткое содержание страницы № 7
English Names of the Buttons and Their Functions [OPEN] button [UP], [DN] buttons • Deeply push in [OPEN] button to unlock the • Press the button upward or downward to flip down panel. recall the stored station while in the radio mode. [SRC] button • Select the folder while in the MP3/WMA/AAC • Press the button to turn on the power. mode. • Press and hold the button for 1 second or • Perform various settings. longer to turn off the power. [ ] (SOUND) button • Switch the operation mode among
Краткое содержание страницы № 8
English Display Items Operation status indication Source, Titles, function, Setting, Clock, etc. are displayed Operation status indication Titles, frequency, band, channel, play time, etc. are displayed : MUTE indication : Enter indication : Digital Z-Enhancer indication 23 : Source indication CD, USB etc. are displayed : MP3 indication MP3 ALL : Disc or Folder indication WMA : WMA indication : Repeat indication : AAC indication AAC : Scan indication : Sound Restorer indicat
Краткое содержание страницы № 9
English 4. DCP (DETACHABLE CONTROL PANEL) The control panel can be detached to prevent CAUTION theft. When detaching the control panel, store it in the DCP (DETACHABLE CONTROL PANEL) Be sure to close the HOLD FLAP for safety case to prevent scratches. when removing the DCP. We recommend taking the DCP with you when leaving the car. Attaching the DCP 1. Insert the right side of the DCP into the main Removing the DCP unit. 1. Press the [SRC] button for 1 second or 2. Insert the left side of
Краткое содержание страницы № 10
English 5 2 0 2 R 5. REMOTE CONTROL Inserting the Battery 1 Turn over the remote control unit and slide the cover in the direction indicated by the arrow in the illustration. 2 Insert the battery (CR2025) into the insertion guides, with the printed side (+) facing upwards. 3 Press the battery in the direction indicated by the arrow so that it slides into the compartment. 4 Replace the cover and slide in until it clicks into place. Insertion guide Notes: Misuse may result in rupture of
Краткое содержание страницы № 11
English Functions of Remote Control Unit Buttons ∗ Some buttons on the remote control unit have different functions from the corresponding buttons on the main unit. Signal transmitter [SRC] [ ] BND [MUTE] [ ] DISP [ISR] [RDM] [ ] RPT [SCN] ● Shared modes ● Radio/Satellite Radio modes [SRC] button [BND] button • Press the button to turn on the power. • Switches reception band. Press and hold the button for 1 second or [x], [v] buttons longer to turn off the power. • Moves preset channels up and
Краткое содержание страницы № 12
English Functions of Remote Control Unit Buttons [] button ● iPod mode • Switches between playback and pause. [x], [v] buttons [SCN] button • Press to move the tracks up and down. • Press to perform scan play. • Press and hold the button for 1 second or longer to perform fast-forward/fast-backward. • When in MP3/WMA/AAC and USB/MTP modes, press and hold the button for 1 [ ] button second or longer to perform folder scan play. • Switches between playback and pause. [RPT] button [RPT] button •
Краткое содержание страницы № 13
English 6. OPERATIONS Note: • Be sure to read this chapter referring to the front diagrams of chapter “3. CONTROLS” on page 6. Basic Operations Selecting a mode CAUTION 1. Press the [SRC] button to change the Be sure to lower the volume before operation mode. switching off the unit power or the ignition 2. Each time you press the [SRC] button, the key. The unit remembers its last volume operation mode changes in the following setting. If you switch the power off with the order: volume up,
Краткое содержание страницы № 14
English Basic Operations Adjusting MAGNA BASS EXTEND Adjusting Sound Mode The MAGNA BASS EXTEND does not adjust the low sound area like the normal sound adjustment function, but emphasizes the deep To change sound mode bass sound area to provide you with a dynamic 1. Press the [ ] button and select the sound sound. mode to adjust. 1. Press and hold the [ ] button for 1 second 2. Push the [SEEK PANEL] leftward or or longer to turn on the MAGNA BASS rightward to select the “item name”. EXT
Краткое содержание страницы № 15
English Basic Operations ● Setting the Digital Z-Enhancer Level Q curve(Q) This unit are provided with 3 types of sound tone (dB) F Q = f effects stored in memory. Select the one you prefer. ∗ The factory default setting is “DZE OFF”. 3dB Gain 2-1. Select the “DZE”. f 3-1. Press the [UP] or [DN] button to select the tone effect. Each time you press the [UP] or [DN] button, the tone effect changes in the Frequency following order: curve “DZE OFF” ↔ “DZE 1” ↔ “DZE 2” ↔ “DZE Center Frequency Fr
Краткое содержание страницы № 16
English Basic Operations ● Adjusting the treble ● Setting low pass filter The treble gain and treble FREQ (center 2-1. Select “S-W LPF”. frequency) can be adjusted as follows. 3-1. Press the [UP] or [DN] button to select the The adjustment can only be performed when the setting. DZE is set to “DZE OFF”. Each time you press the [UP] or [DN] 2-1. Select “TREBLE”. button, the setting changes in the following order: 2-2. Press the [ ] button. “THROUGH” ↔ “50Hz” ↔ “80Hz” ↔ 2-3. Push the [SEEK PAN
Краткое содержание страницы № 17
English Radio Operations ● Quick tuning Listening to the radio Push the [SEEK PANEL] leftward or rightward 1. Press the [SRC] button and select the radio and hold in position for 1 second or longer to mode. The frequency appears in the display. tune in a station. 2. Press the [MENU] button and select the ● Step tuning radio band. Each time the button is pressed, Push the [SEEK PANEL] leftward or rightward the radio reception band changes in the to manually tune in a station. following ord
Краткое содержание страницы № 18
English Radio Operations Auto store Instant station recall (ISR) Auto store is a function for storing up to 6 Instant station recall is a special radio preset stations that are automatically tuned in that instantly accesses a favorite radio station at sequentially. If 6 receivable stations cannot be a touch of a button. The ISR function even received, a previously stored station remains operates with the unit in other modes. unoverwritten at the memory position. ● ISR memory 1. Press the [MEN
Краткое содержание страницы № 19
English CD/MP3/WMA/AAC Operations • When playing AAC files that include image MP3/WMA/AAC data, additional time may be required before playback begins. What is MP3? • Files may not play properly, depending on the MP3 is an audio compression method and iTunes version under which an AAC file is classified into audio layer 3 of MPEG standards. encoded. This audio compression method has penetrated into PC users and become a standard format. This MP3 features the original audio data Precaution
Краткое содержание страницы № 20
English CD/MP3/WMA/AAC Operations ● Number of files or folders CAUTION 1. Up to 255 files can be recognized per folder. Up to 510 files can be played. � Do not try to put your hand or fingers in the disc insertion slot. Also never insert 2. Tracks are played in the order that they were foreign objects into the slot. recorded onto a disc. (Tracks might not always be played in the order displayed on � Do not insert discs where adhesive comes the PC.) out from cellophane tape or a rental CD
Главная Распиновка разъемов Распиновка разъемов автомагнитол Clarion
CLARION Made in UZBEKISTAN

Установлено на DAEWOO NEXIA 2010 год выпуска
Магнитола не имеет каких либо опознавательных знаков
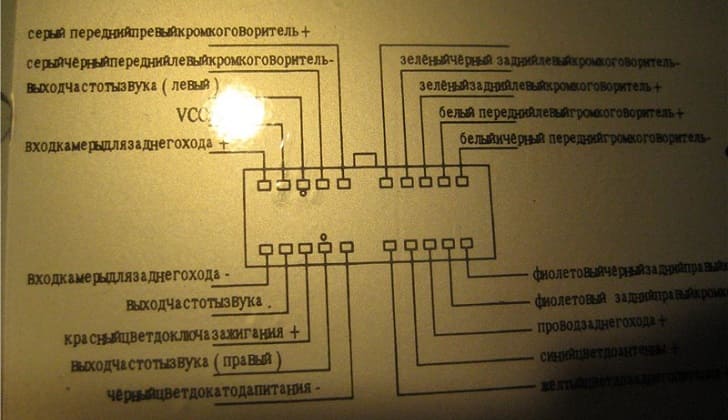
Разъём магнитолы CLARION

Разъём магнитолы CLARION

Разъём магнитолы CLARION
CLARION Model:391001-65010 (SUZUKI)
Разъём магнитолы CLARION
CLARION Model:39101-65D10 (PS-1626D-B)SUZUKI
Разъём магнитолы CLARION

CLARION RAX 6500Z, DXZ-615, PS-2181J
Разъём магнитолы CLARION
CLARION FINISH LINE 742 PT9653V
Разъём магнитолы CLARION
CLARION - ARX - 6570Rz
CLARION - DXZ38RMP RDS EON
Разъём магнитолы CLARION
CLARION CXR401
Разъём магнитолы CLARION
CLARION RAX 531D
Разъём магнитолы CLARION
CLARION RAX660DZ
Разъём магнитолы CLARION
CLARION CRH71 PE-9411A
Разъём магнитолы CLARION
Разъём магнитолы CLARION
CLARION ADX-5355
CLARION ARX-6370
Разъём магнитолы CLARION
CLARION DRX-7575Z
Разъём магнитолы CLARION
CLARION 15120
Mitsubishi Motors model: C602
Разъём магнитолы CLARION
CLARION PU-9397D-A
NATIONAL RM-Z11SAB
Разъём магнитолы CLARION
CLARION PU-9150-B
Разъём магнитолы CLARION

CLARION RN-9150U
Разъём магнитолы CLARION
CLARION ARX 6170 R
Разъём магнитолы CLARION
CLARION PF-1509A
(SUBARU) Made in Philippines
Разъём магнитолы CLARION
CLARION PU-1666A-A (VW)
CLARION PU-2184A (Peugeot 406)
Разъём магнитолы CLARION
CLARION PT-9672L
Разъём магнитолы CLARION

Suzuki PS-2428D (Clarion Co., Ltd)
Распиновка отсутствует.
Разъём магнитолы CLARION

Subaru PF-2343I-A (Clarion, made in Japan)
Разъём магнитолы CLARION

CLARION RN-9266U Made In Japan
Разъём магнитолы CLARION

CLARION PA-2247A Made In Japan
ADDZEST Model: ADX5355
Разъём магнитолы CLARION

CLARION CRX63R
Разъём магнитолы CLARION

CLARION DB358 RMP
Разъём магнитолы CLARION

ADDZEST ADX55555z
CLARION PS-2181J
Разъём магнитолы CLARION
CLARION DXZ-615
CLARION PS-2181J
CLARION RAX-6500Z
Разъём магнитолы CLARION
CLARION PI-9668N
Разъём магнитолы CLARION
CLARION PT-8126U
Разъём магнитолы CLARION
CLARION RN-9150U
Разъём магнитолы CLARION

CLARION QZ-6600N (Монитор)
Разъём магнитолы CLARION

CLARION PS-2654D-B 39101-65J30 (Suzuki)
Разъём магнитолы CLARION
CLARION - модель PX2640AG
DAEWOO 96192335U00
Разъём магнитолы CLARION
Разъём магнитолы CLARION
Разъём магнитолы CLARION
CLARION - модель PX3121AA
DAEWOO 96211884U00
Разъём магнитолы CLARION
Разъём магнитолы CLARION

CLARION - модель PU-1633A
Соединение магнитолы с LCD дисплеем, для включении на столе.
Разъём магнитолы CLARION
CLARION - модель PU-9150B
Разъём магнитолы CLARION

CLARION CC45 66ARX PT-2674J
Разъём магнитолы CLARION
Разъём магнитолы CLARION
CLARION CZ641U6 (PF-2950A-A) Part number 86201FG640
Ставится на автомобиль - Subaru Impreza
Разъём магнитолы CLARION

Разъём магнитолы CLARION

Разъём магнитолы CLARION

Разъём магнитолы CLARION
Наша цель - обеспечить Вам самый быстрый доступ к руководству по эксплуатации устройства Clarion DXZ585USB . Пользуясь просмотром онлайн Вы можете быстро просмотреть содержание и перейти на страницу, на которой найдете решение своей проблемы с Clarion DXZ585USB .
Для Вашего удобства
Если просмотр руководства Clarion DXZ585USB непосредственно на этой странице для Вас неудобен, Вы можете воспользоваться двумя возможными решениями:
- Полноэкранный просмотр -, Чтобы удобно просматривать инструкцию (без скачивания на компьютер) Вы можете использовать режим полноэкранного просмотра. Чтобы запустить просмотр инструкции Clarion DXZ585USB на полном экране, используйте кнопку Полный экран .
- Скачивание на компьютер - Вы можете также скачать инструкцию Clarion DXZ585USB на свой компьютер и сохранить ее в своем архиве. Если ты все же не хотите занимать место на своем устройстве, Вы всегда можете скачать ее из ManualsBase.
Печатная версия
Многие предпочитают читать документы не на экране, а в печатной версии. Опция распечатки инструкции также предусмотрена и Вы можете воспользоваться ею нажав на ссылку, находящуюся выше - Печатать инструкцию . Вам не обязательно печатать всю инструкцию Clarion DXZ585USB а только некоторые страницы. Берегите бумагу.
Резюме
Ниже Вы найдете заявки которые находятся на очередных страницах инструкции для Clarion DXZ585USB . Если Вы хотите быстро просмотреть содержимое страниц, которые находятся на очередных страницах инструкции, Вы воспользоваться ими.
Краткое содержание страницы № 1
Краткое содержание страницы № 2
English This equipment has been tested and found to comply with the limits for a Class B digital device, pursuant to Part 15 of the FCC Rules. These limits are designed to provide reasonable protection against harmful interference in a residential installation. This equipment generates, uses, and can radiate radio frequency energy and, if not installed and used in accordance with the instructions, may cause harmful interference to radio communications. However, there is no guarantee that in
Краткое содержание страницы № 3
Краткое содержание страницы № 4
English 1.FEATURES • 6ch/6V RCA Output / 53W ✕ 4 Built-in MOSFET Amplifier ® • USB Audio for iPod • USB Digital Media Streaming Capability ∗ “iPod” is for legal or rightholder-authorized copying only. Don’t steal music. “iPod” is a trademark of Apple Inc., registered in the U.S. and other countries. ∗ XM and the XM logos are trademarks of XM Satellite Radio Inc. 2. PRECAUTIONS 1. When the inside of the car is very cold and CAUTION the player is used soon after switching on the heater moisture
Краткое содержание страницы № 5
English Flip Down Panel 3. Do not use the FLIP DOWN PANEL as a tray 5. Strong impacts to the operating or display to place objects on when it is open. section can cause damage or deformation. 4. When closing the FLIP DOWN PANEL, do 6. If the FLIP DOWN PANEL does not open not press the [OPEN] button. fully, gently open it with your hand. ∗ Press the center of the DCP to close. DCP Handling Compact Discs Use only compact discs bearing the or of such discs may cause misoperation or damage. mar
Краткое содержание страницы № 6
Краткое содержание страницы № 7
English Names of the Buttons and Their Functions [OPEN] button [UP], [DN] buttons • Deeply push in [OPEN] button to unlock the • Press the button upward or downward to flip down panel. recall the stored station while in the radio mode. [SRC] button • Select the folder while in the MP3/WMA/AAC • Press the button to turn on the power. mode. • Press and hold the button for 1 second or • Perform various settings. longer to turn off the power. [ ] (SOUND) button • Switch the operation mode among
Краткое содержание страницы № 8
English Display Items Operation status indication Source, Titles, function, Setting, Clock, etc. are displayed Operation status indication Titles, frequency, band, channel, play time, etc. are displayed : MUTE indication : Enter indication : Digital Z-Enhancer indication 23 : Source indication CD, USB etc. are displayed : MP3 indication MP3 ALL : Disc or Folder indication WMA : WMA indication : Repeat indication : AAC indication AAC : Scan indication : Sound Restorer indicat
Краткое содержание страницы № 9
English 4. DCP (DETACHABLE CONTROL PANEL) The control panel can be detached to prevent CAUTION theft. When detaching the control panel, store it in the DCP (DETACHABLE CONTROL PANEL) Be sure to close the HOLD FLAP for safety case to prevent scratches. when removing the DCP. We recommend taking the DCP with you when leaving the car. Attaching the DCP 1. Insert the right side of the DCP into the main Removing the DCP unit. 1. Press the [SRC] button for 1 second or 2. Insert the left side of
Краткое содержание страницы № 10
English 5 2 0 2 R 5. REMOTE CONTROL Inserting the Battery 1 Turn over the remote control unit and slide the cover in the direction indicated by the arrow in the illustration. 2 Insert the battery (CR2025) into the insertion guides, with the printed side (+) facing upwards. 3 Press the battery in the direction indicated by the arrow so that it slides into the compartment. 4 Replace the cover and slide in until it clicks into place. Insertion guide Notes: Misuse may result in rupture of
Краткое содержание страницы № 11
English Functions of Remote Control Unit Buttons ∗ Some buttons on the remote control unit have different functions from the corresponding buttons on the main unit. Signal transmitter [SRC] [ ] BND [MUTE] [ ] DISP [ISR] [RDM] [ ] RPT [SCN] ● Shared modes ● Radio/Satellite Radio modes [SRC] button [BND] button • Press the button to turn on the power. • Switches reception band. Press and hold the button for 1 second or [x], [v] buttons longer to turn off the power. • Moves preset channels up and
Краткое содержание страницы № 12
English Functions of Remote Control Unit Buttons [] button ● iPod mode • Switches between playback and pause. [x], [v] buttons [SCN] button • Press to move the tracks up and down. • Press to perform scan play. • Press and hold the button for 1 second or longer to perform fast-forward/fast-backward. • When in MP3/WMA/AAC and USB/MTP modes, press and hold the button for 1 [ ] button second or longer to perform folder scan play. • Switches between playback and pause. [RPT] button [RPT] button •
Краткое содержание страницы № 13
English 6. OPERATIONS Note: • Be sure to read this chapter referring to the front diagrams of chapter “3. CONTROLS” on page 6. Basic Operations Selecting a mode CAUTION 1. Press the [SRC] button to change the Be sure to lower the volume before operation mode. switching off the unit power or the ignition 2. Each time you press the [SRC] button, the key. The unit remembers its last volume operation mode changes in the following setting. If you switch the power off with the order: volume up,
Краткое содержание страницы № 14
English Basic Operations Adjusting MAGNA BASS EXTEND Adjusting Sound Mode The MAGNA BASS EXTEND does not adjust the low sound area like the normal sound adjustment function, but emphasizes the deep To change sound mode bass sound area to provide you with a dynamic 1. Press the [ ] button and select the sound sound. mode to adjust. 1. Press and hold the [ ] button for 1 second 2. Push the [SEEK PANEL] leftward or or longer to turn on the MAGNA BASS rightward to select the “item name”. EXT
Краткое содержание страницы № 15
English Basic Operations ● Setting the Digital Z-Enhancer Level Q curve(Q) This unit are provided with 3 types of sound tone (dB) F Q = f effects stored in memory. Select the one you prefer. ∗ The factory default setting is “DZE OFF”. 3dB Gain 2-1. Select the “DZE”. f 3-1. Press the [UP] or [DN] button to select the tone effect. Each time you press the [UP] or [DN] button, the tone effect changes in the Frequency following order: curve “DZE OFF” ↔ “DZE 1” ↔ “DZE 2” ↔ “DZE Center Frequency Fr
Краткое содержание страницы № 16
English Basic Operations ● Adjusting the treble ● Setting low pass filter The treble gain and treble FREQ (center 2-1. Select “S-W LPF”. frequency) can be adjusted as follows. 3-1. Press the [UP] or [DN] button to select the The adjustment can only be performed when the setting. DZE is set to “DZE OFF”. Each time you press the [UP] or [DN] 2-1. Select “TREBLE”. button, the setting changes in the following order: 2-2. Press the [ ] button. “THROUGH” ↔ “50Hz” ↔ “80Hz” ↔ 2-3. Push the [SEEK PAN
Краткое содержание страницы № 17
English Radio Operations ● Quick tuning Listening to the radio Push the [SEEK PANEL] leftward or rightward 1. Press the [SRC] button and select the radio and hold in position for 1 second or longer to mode. The frequency appears in the display. tune in a station. 2. Press the [MENU] button and select the ● Step tuning radio band. Each time the button is pressed, Push the [SEEK PANEL] leftward or rightward the radio reception band changes in the to manually tune in a station. following ord
Краткое содержание страницы № 18
English Radio Operations Auto store Instant station recall (ISR) Auto store is a function for storing up to 6 Instant station recall is a special radio preset stations that are automatically tuned in that instantly accesses a favorite radio station at sequentially. If 6 receivable stations cannot be a touch of a button. The ISR function even received, a previously stored station remains operates with the unit in other modes. unoverwritten at the memory position. ● ISR memory 1. Press the [MEN
Краткое содержание страницы № 19
English CD/MP3/WMA/AAC Operations • When playing AAC files that include image MP3/WMA/AAC data, additional time may be required before playback begins. What is MP3? • Files may not play properly, depending on the MP3 is an audio compression method and iTunes version under which an AAC file is classified into audio layer 3 of MPEG standards. encoded. This audio compression method has penetrated into PC users and become a standard format. This MP3 features the original audio data Precaution
Краткое содержание страницы № 20
English CD/MP3/WMA/AAC Operations ● Number of files or folders CAUTION 1. Up to 255 files can be recognized per folder. Up to 510 files can be played. � Do not try to put your hand or fingers in the disc insertion slot. Also never insert 2. Tracks are played in the order that they were foreign objects into the slot. recorded onto a disc. (Tracks might not always be played in the order displayed on � Do not insert discs where adhesive comes the PC.) out from cellophane tape or a rental CD
Что такое iso
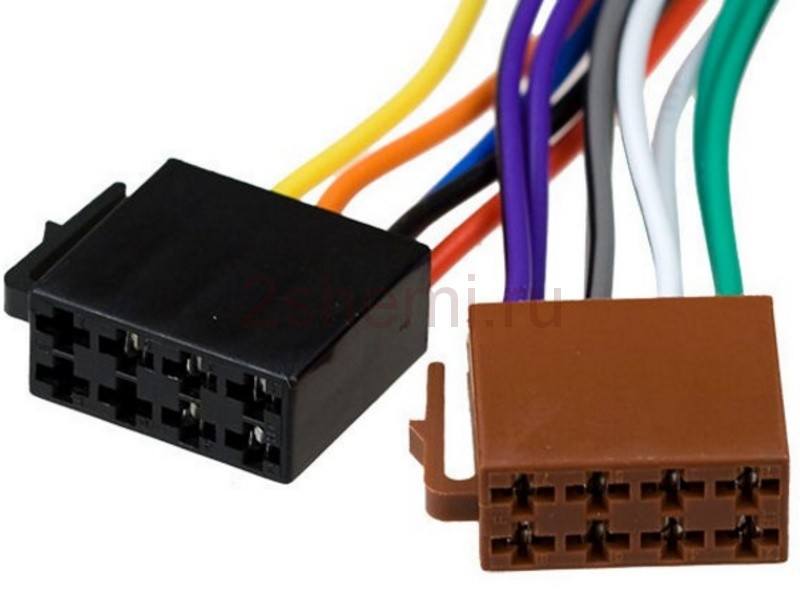
Распиновка стандартного евроразъема
Евроразъемом называют стандартный штекер, который используют в большинстве стран мира. При подключении оборудования можно столкнуться с запутанными в пучок нестандартными проводами. Решается эта проблема приобретением переходников и распиновкой фишек магнитолы.
Стандарты 1din и 2din
Разъемы акустических систем бывают двух видов: нестандартные от компании-производителя в основном штырькового вида и стандартизированные европейские, которые находятся сзади. Установка оборудования со специальным аудиоразъемом от производителя потребует использование специального фирменного коннектора. Если штекер ISO, то подключиться нему можно напрямую. Евроразъемы бывают двух видов 1din и 2din, разница в высоте автомагнитол. Двухблочный в два раза выше, подсоединяется не ко всем автомобилям, потому что на панели нет места под нужные размеры.
Магнитолы с европейским 1din самые распространенные.
При установке автомагнитол применяют провода с маленьким диаметром 1,5-2 мм, для силовых линий – с большим сечением. Несоблюдение этих простых правил исказит звук, выведет оборудование из строя.
| № 1 | — |
| № 2 | — |
| № 3 | — |
| № 4 | Постоянное питание |
| № 5 | Питание антенны |
| № 6 | Подсветка |
| № 7 | Зажигание |
| № 8 | Масса |
Производители в Японии, США и некоторые китайские применяют стандарт 2din.
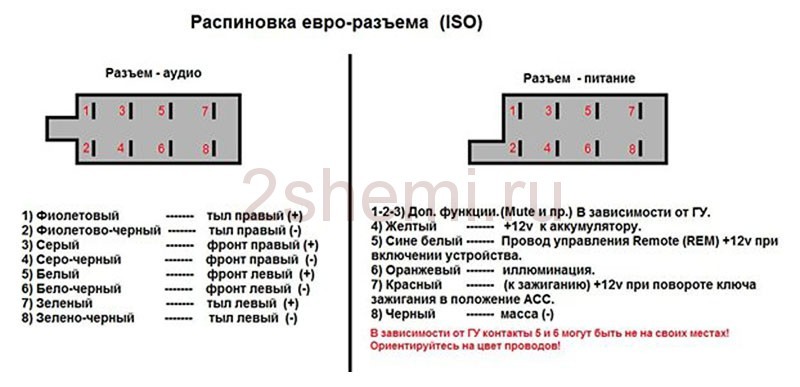
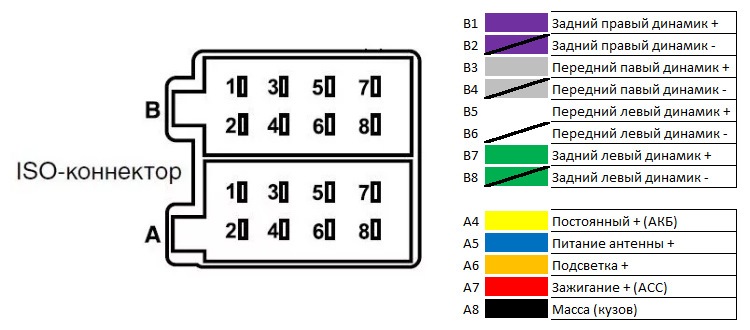
Верхний силовой разъем А
Штекер используют для питания электричеством ресивера, антенны и усилителя, а также при необходимости управления подсветкой или при отключении сигнала звука. Применяют стандартную маркировку по цветовой гамме. Выходы 1-3 и 6 в акустике низкого и среднего ценового сегмента не используются, они предназначены для дополнительных опций продукции высокого класса.
Типы подключения
- Первый – соединение в цоколе проводов двух цветов желтого и красного, включение/выключение ресивера не зависит от зажигания. Способ не удобен тем, что предрасполагает к разрядке АКБ, если не выключить акустику;
- Второй – провод подключают через замок зажигания, желтый – к бортовому компьютеру.
Функциональное назначение выходов ресивера
| ANT | Разъем применяется, если в автомобиле имеется выдвижная антенна |
| Remote | Возможно подключение несколько динамиков |
| Illumination | Позволяет менять интенсивность свечения устройства |
| Mute | Регулировка звука |
| А4 | Включение/выключение |
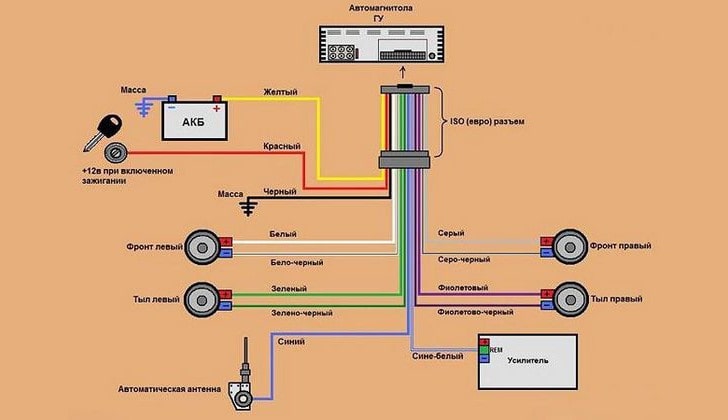
Распиновка ISO-разъема магнитолы
| А 4 | Цв. желтый | Аккумулятор + Питание |
| А 5 | Цв. синий | Антенна. |
| А 6 | Цв. оранжевый | Подсветка |
| А 7 | Цв. красный | Зажигание, 12В. При отключении сброс параметров к заводским. |
| А 8 | Цв. черный | Акустика |
Нижний акустический разъем В
Применяют для подключения усилителей (2 кабеля на каждый). Звучание аппаратуры зависит от того, правильно ли подключены все разъемы. Главное – не перепутать, иначе акустика будет некачественной.
Правила подключения колонок по цветовой маркировке проводов
| Цв. белый | Левая передняя |
| Цв. серый | Правая передняя |
| Цв. зеленый | Левая задняя |
| Цв. фиолетовый | Правая задняя |
Двойной ИСО разъем
Штатные аудиосистемы некоторых автомобилей подключаются двойным штекером. Распиновка разъемов для них стандартная. Половинки контактов соединяются между собой прочной пластиковой перемычкой, фиксируются специальным зажимом. Для корректного монтажа используется направляющий паз, который исключает установку штекера в неправильном положении.
Черный присоединяет к магнитоле источник тока, коричневый – для акустики .
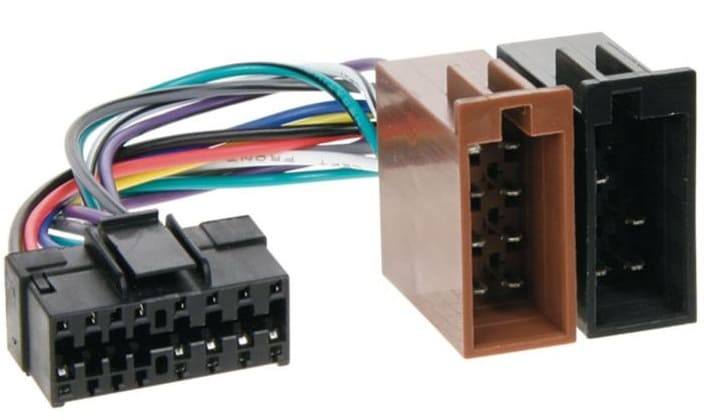
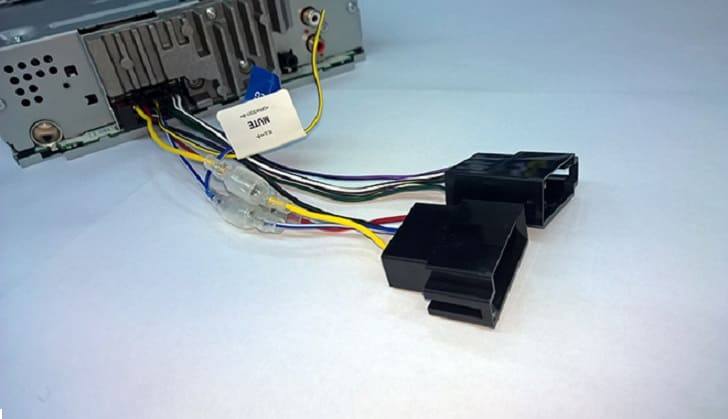
Переходники для iso разъемов
Срезка нестандартного штатного штекера и присоединение проводов напрямую не рекомендуется, потому что со временем соединение разболтается, может окислиться, придется спаивать не только проводку, потребуется дополнительный ремонт, замена перегоревших предохранителей. Иногда встречается акустика с тремя выходами, но она имеет стандаризированную маркировку и электросхемы, позволяющие соединить с помощью распиновки штатные кабели с устройством. Можно купить любой тип переходника для ИСО разъёмов от одной модели к другой.
Автомобиль может быть не оснащен коннекторами, тогда нужно подключать разъем магнитолы к кабелю напрямую. Это делают скручиванием, пайкой либо применяют клеммную колодку, которая не требует последующей изоляции. При скручивании и пайке используют термоусадочные трубки для безопасного использования оборудования.
Распиновка для различных марок авто и магнитол
Приступая к работе, ознакомьтесь с инструкцией к ресиверу, а также обратите внимание на маркировку и фишки самого изделия. На распиновку магнитол влияют штатные разъемы в разных автомобилях.
Схема распиновки iso разъемов к магнитолам pioneer

Чтобы не сжечь акустику, перед подключением динамиков нужно подсоединить магнитолу, проверить, чтобы она светилась и переключалась.
toyota
Распиновку акустики этой марки осуществляют по стандартным схемам. Оптимально выбрать систему питания от АКБ, в этом случае нет риска его разрядки.
| № 1 | А+ |
| № 2 | GND |
| № 3 | BAT+ |
| № 4 | Подсветка |
| № 5 | Антенна |
| № 6 | Динамики (RR+, RR-, RF+, RF-, LF+, LF-, LR+, LR-) |
При подключении магнитолы используются стандартные схемы.
| № 1 | ANT |
| № 3 | LR. Линейный выход |
| № 4 | GND. Линейных выход |
| № 5 | RR. Линейный выход |
| № 6 | CD – LCH |
| № 7 | CD – GND |
| № 8 | CD – RCH |
| № 9 | CD – Reset |
| № 10 | CD – CD clock out |
| № 11 | CD – DSPL select |
| № 12 | CD – data out |
| № 13 | CD – clock in |
| № 14 | CD – data in |
| № 16 | A+ |
| № 17 | GND |
| № 18 | ANT GND |
| № 22-27 | Динамики (LF-, LR+, RF-, RR+, LF+, LR-, RF+, RR-) |
| № 28 | Mute |
| № 29-30 | Динамики (LF-, LR+, RF-, RR+, LF+, LR-, RF+, RR-) |
| № 31 | ANT CONT |
| № 32 | CD ACC Постоянный |
| № 33 | AMP Постоянный |
| № 34 | B UP |
nissan
| № 1-6 | Динамики (LR+, RR+, LR-, RR-, LF+, RF+) |
| № 7 | А+ |
| № 8 | Подсветка |
| № 9 | BAT+ |
| № 10 | Динами LF- |
| № 11 | динамик RF- |
| № 12 | Антенна |
| № 13 | GND |
honda
Все модели автомобильных магнитол оборудованы универсальным европейским штекером для подключения к гнезду.
| № 1 | Динамик RR+ |
| № 2 | Динамик LR+ |
| № 3 | Подсветка |
| № 4 | BAT+ |
| № 5 | A+ |
| № 6 | Антенна |
| № 7-10 | Динамики LF+, RF+, RR-, LR- |
| № 13 | GND |
| № 14-15 | Динамики LF-, RF- |
Стандартная европейская разводка выводов.
| № 1 | А+ |
| № 2 | BAT+ |
| № 3 | GND |
| № 4 | — |
| № 5-12 | Динамики RR+, RR-, LF+, LF-, RF+, RF-, LR+, LR- |
alpine
Alpine TDE-7823W: 1 – BAT+,
| № 2-5 | Динамики LR-, LR+, RR-, RR+ |
| № 7 | Усилитель |
| № 8 | Антенна |
| № 9 | GND |
| № 10-13 | Динамики LF-, LF+, RF-, RF+ |
| № 5-12 | А+ |
mitsubishi
Во всех моделях используется стандартная европейская распиновка акустической системы.
| № 1-2 | Динамики RR+, LR+ |
| № 3 | Управление антенной |
| № 4 | Управление подсветкой |
| № 5-8 | Динамики LF+, RF+, RR-, LR- |
| № 10 | А+ |
| № 11 | BAT+ |
| № 12 | Управление подсветкой |
| № 13-14 | Динамики LF-, RF- |
| GND |
Видео разбор распиновки автомагнитолы
Главная Распиновка разъемов Распиновка разъемов автомагнитол Clarion
CLARION Made in UZBEKISTAN
Установлено на DAEWOO NEXIA 2010 год выпуска
Магнитола не имеет каких либо опознавательных знаков
Разъём магнитолы CLARION
Разъём магнитолы CLARION
Разъём магнитолы CLARION
CLARION Model:391001-65010 (SUZUKI)
Разъём магнитолы CLARION
CLARION Model:39101-65D10 (PS-1626D-B)SUZUKI
Разъём магнитолы CLARION
CLARION RAX 6500Z, DXZ-615, PS-2181J
Разъём магнитолы CLARION
CLARION FINISH LINE 742 PT9653V
Разъём магнитолы CLARION
CLARION - ARX - 6570Rz
CLARION - DXZ38RMP RDS EON
Разъём магнитолы CLARION
CLARION CXR401
Разъём магнитолы CLARION
CLARION RAX 531D
Разъём магнитолы CLARION
CLARION RAX660DZ
Разъём магнитолы CLARION
CLARION CRH71 PE-9411A
Разъём магнитолы CLARION
Разъём магнитолы CLARION
CLARION ADX-5355
CLARION ARX-6370
Разъём магнитолы CLARION
CLARION DRX-7575Z
Разъём магнитолы CLARION
CLARION 15120
Mitsubishi Motors model: C602
Разъём магнитолы CLARION
CLARION PU-9397D-A
NATIONAL RM-Z11SAB
Разъём магнитолы CLARION
CLARION PU-9150-B
Разъём магнитолы CLARION
CLARION RN-9150U
Разъём магнитолы CLARION
CLARION ARX 6170 R
Разъём магнитолы CLARION
CLARION PF-1509A
(SUBARU) Made in Philippines
Разъём магнитолы CLARION
CLARION PU-1666A-A (VW)
CLARION PU-2184A (Peugeot 406)
Разъём магнитолы CLARION
CLARION PT-9672L
Разъём магнитолы CLARION
Suzuki PS-2428D (Clarion Co., Ltd)
Распиновка отсутствует.
Разъём магнитолы CLARION
Subaru PF-2343I-A (Clarion, made in Japan)
Разъём магнитолы CLARION
CLARION RN-9266U Made In Japan
Разъём магнитолы CLARION
CLARION PA-2247A Made In Japan
ADDZEST Model: ADX5355
Разъём магнитолы CLARION
CLARION CRX63R
Разъём магнитолы CLARION
CLARION DB358 RMP
Разъём магнитолы CLARION
ADDZEST ADX55555z
CLARION PS-2181J
Разъём магнитолы CLARION
CLARION DXZ-615
CLARION PS-2181J
CLARION RAX-6500Z
Разъём магнитолы CLARION
CLARION PI-9668N
Разъём магнитолы CLARION
CLARION PT-8126U
Разъём магнитолы CLARION
CLARION RN-9150U
Разъём магнитолы CLARION
CLARION QZ-6600N (Монитор)
Разъём магнитолы CLARION
CLARION PS-2654D-B 39101-65J30 (Suzuki)
Разъём магнитолы CLARION
CLARION - модель PX2640AG
DAEWOO 96192335U00
Разъём магнитолы CLARION
Разъём магнитолы CLARION
Разъём магнитолы CLARION
CLARION - модель PX3121AA
DAEWOO 96211884U00
Разъём магнитолы CLARION
Разъём магнитолы CLARION
CLARION - модель PU-1633A
Соединение магнитолы с LCD дисплеем, для включении на столе.
Разъём магнитолы CLARION
CLARION - модель PU-9150B
Разъём магнитолы CLARION
CLARION CC45 66ARX PT-2674J
Разъём магнитолы CLARION
Разъём магнитолы CLARION
CLARION CZ641U6 (PF-2950A-A) Part number 86201FG640
Ставится на автомобиль - Subaru Impreza
Разъём магнитолы CLARION
Разъём магнитолы CLARION
Разъём магнитолы CLARION
Разъём магнитолы CLARION
Читайте также: