
Enet bmw кабель настройка
Добавил пользователь Евгений Кузнецов Обновлено: 20.09.2024

Все свои машины я всегда диагностировал и кодировал сам, для этого мне вполне хватало K+DCAN. Но для F серий нужен кабель уже нового образца, а именно ENET кабель. Покупал как водится на алике Диагностический кабель Ethernet E-SYS ENET для BMW F-series ICOM OBD2 (ссылку приведу, но продавца не особо советую, кабель хоть и рабочий но шел 100! дней). Стоимость дешевле DCAN, так как по сути это обычная сетевая витая пара, соединяющая два компьютера в сеть )

На моем ноутбуке программа диагностики BMW Rheingold ISTA уже стояла, поэтому необходимо было только все донастроить для работы с ENET кабелем.
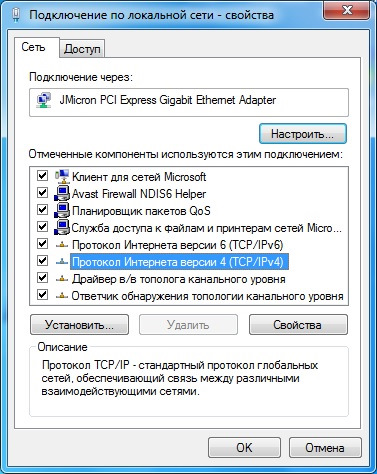
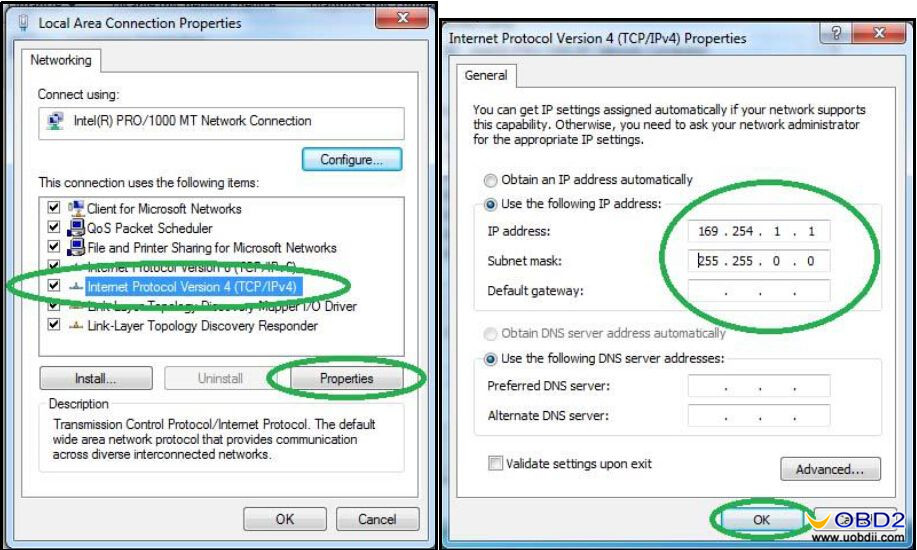
Сначала подключаем кабель, в машину в OBD2, в ноутбук в гнездо сетевой карты. Дальше открываем на ноуте свойства сетевого подключения и выбираем "Свойства" для "Протокол Интернета версии 4 (TCP/IPv4)".
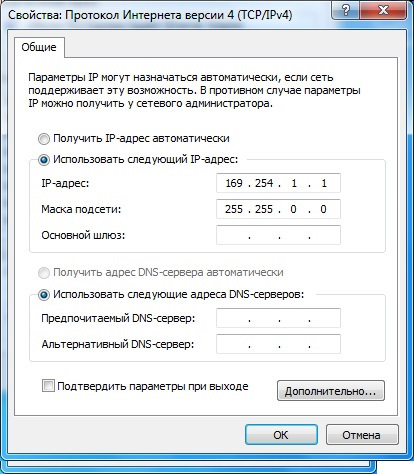
Вводим в поле IP-адрес 169.254.1.1 и Маску подсети 255.255.0.0
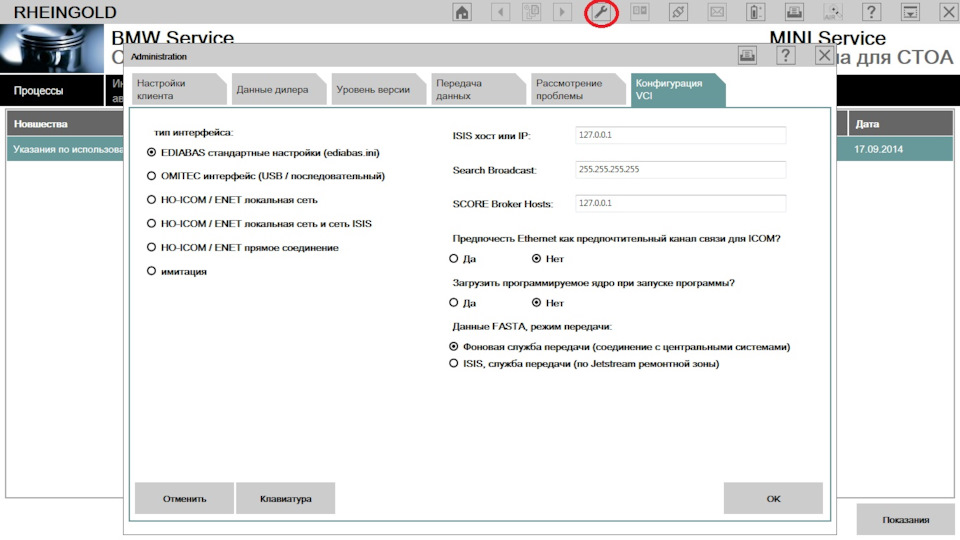
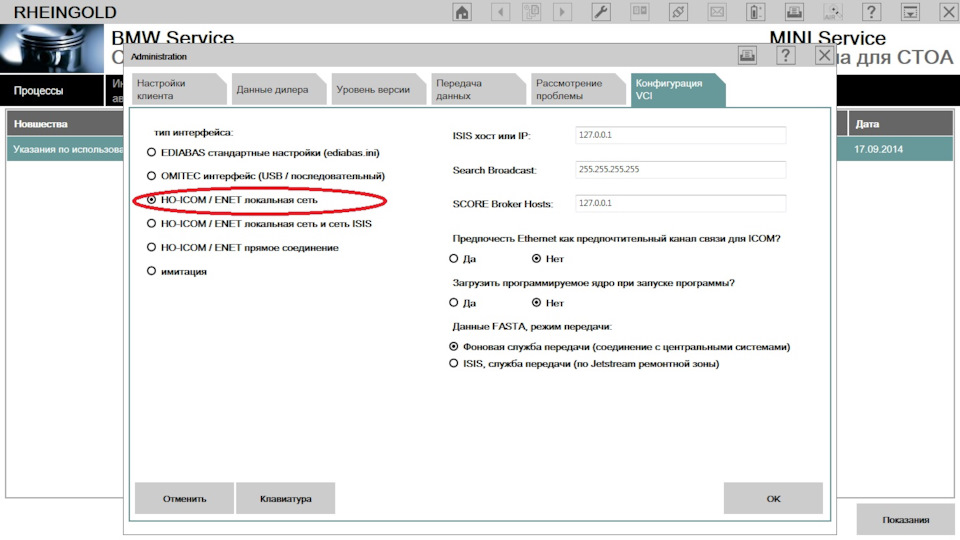
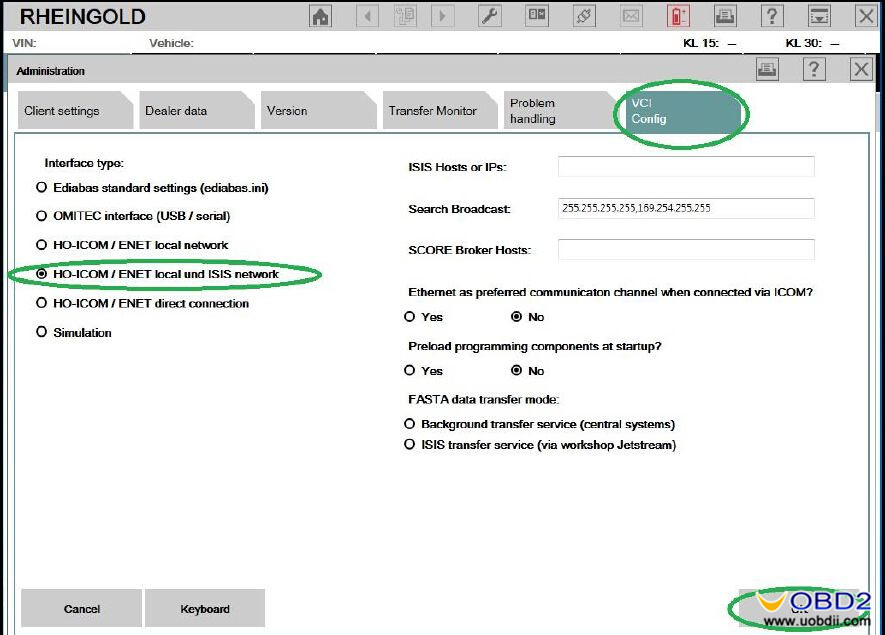
Далее запускаем Rheingold и идем в Настройки \ Конфигурацию VCI.
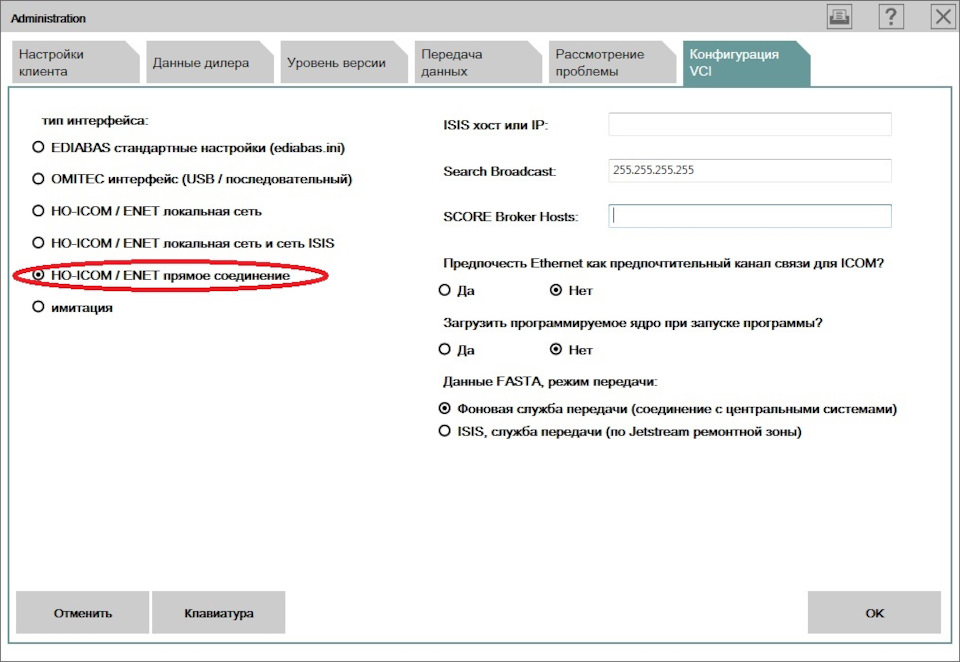
Тип интерфейса выбираем HO-ICOM / ENET прямое соединение.
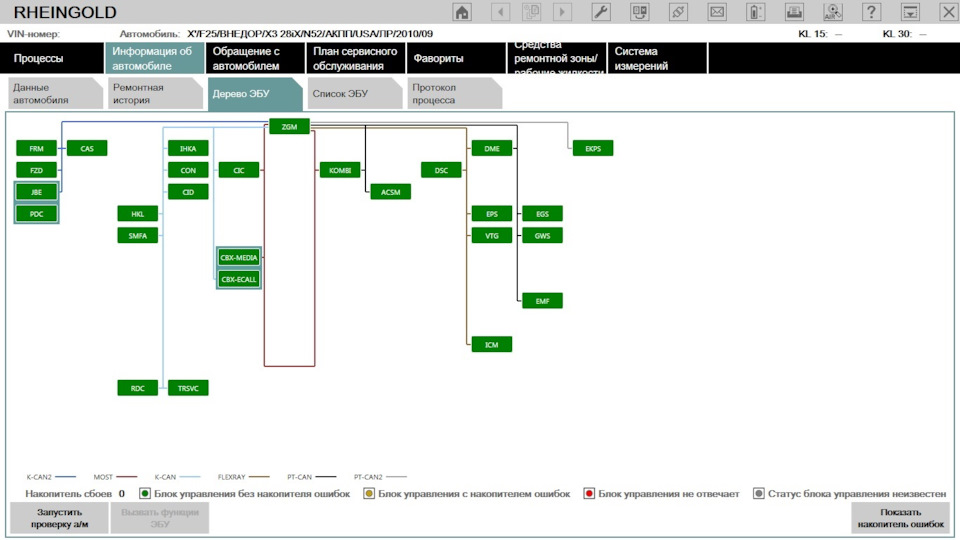
Собственно и все, читаем машину как обычно, но после нажатия Идентификации нужно будет выбрать ENET.
Все работает, все читается
Благодаря комментариям, выяснился еще более простой вариант. Необходимо в Настройки \ Конфигурацию VCI выбрать пункт HO-ICOM / ENET локальная сеть.
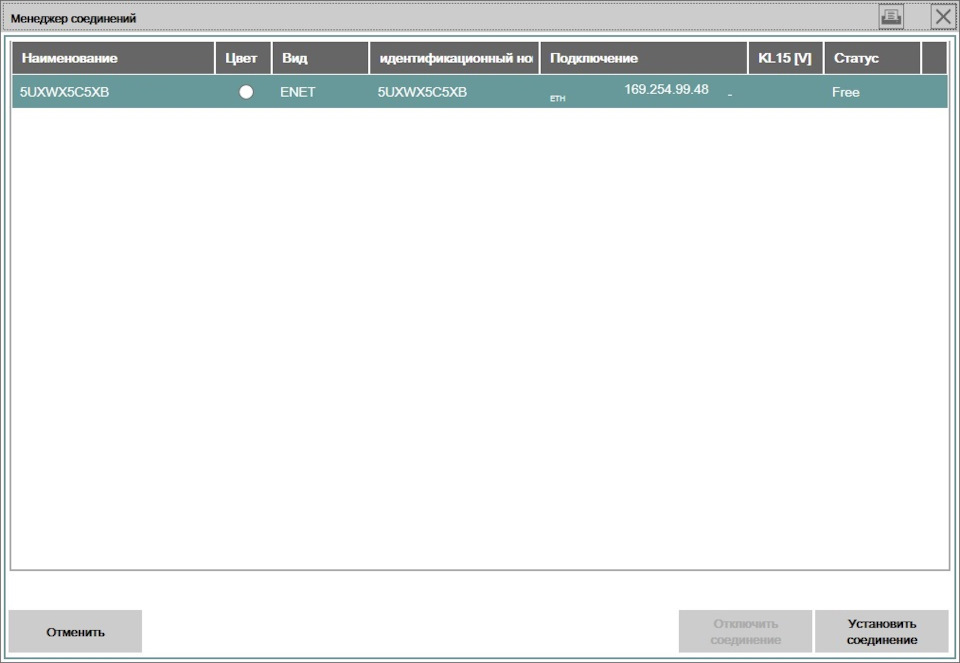
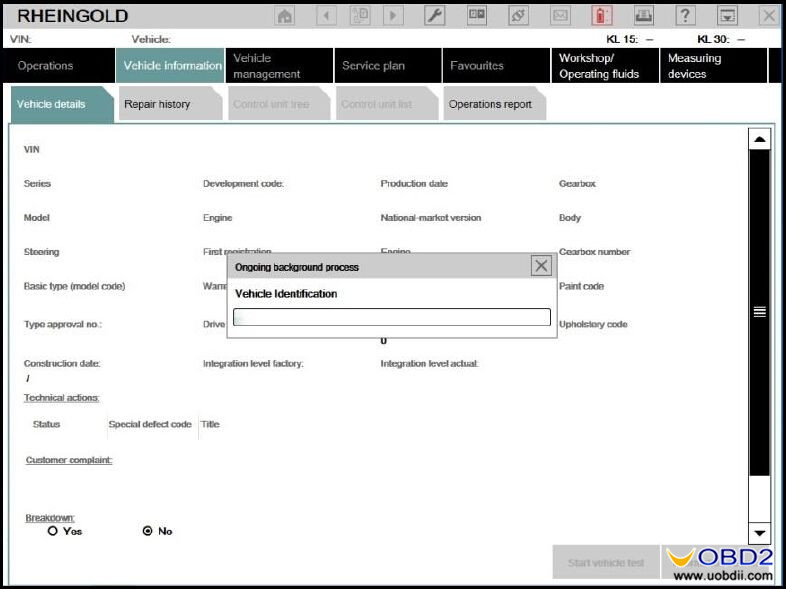
Тогда при Идентификации будет выпадать Менеджер соединений, в котором будет видна машина. После подключения кабеля к машине необходимо некоторые время чтобы появилось соединение с машиной.
Дальше все как обычно, проверил тоже работает
Вроде все элементарно, но мне как человеку впервые столкнувшемуся с F серией пришлось немного погуглить, надеюсь кому то будет полезно и сэкономит немного времени.

Подключаем кабель в машину в OBD2, а затем в ноутбук - в гнездо сетевой карты. Дальше открываем на ноубуке "Свойства сетевого подключения" и выбираем "Свойства" для "Протокол Интернета версии 4 (TCP/IPv4)".
.jpg)
Вводим в поле IP-адрес 169.254.1.1 и Маску подсети 255.255.0.0
.jpg)
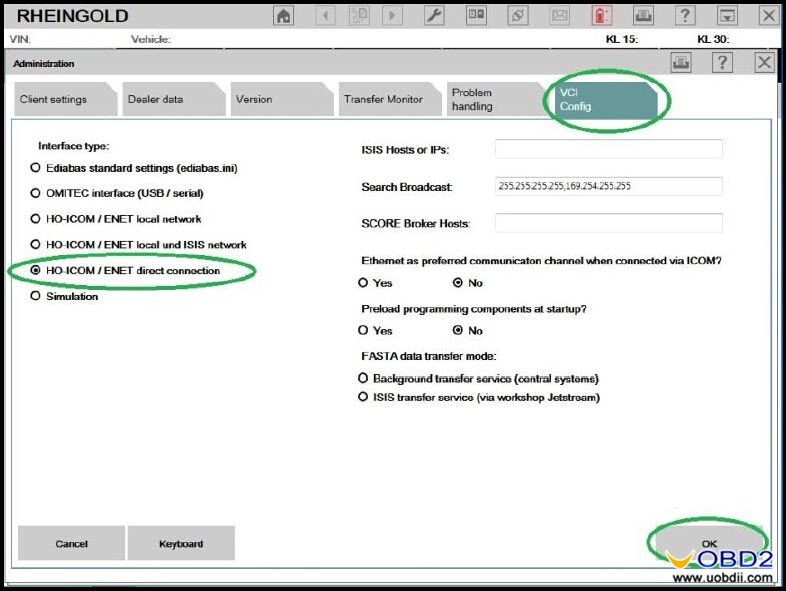
Далее запускаем Rheingold и идем в Настройки \ Конфигурацию VCI.
.jpg)
Тип интерфейса выбираем HO-ICOM / ENET прямое соединение.
.jpg)
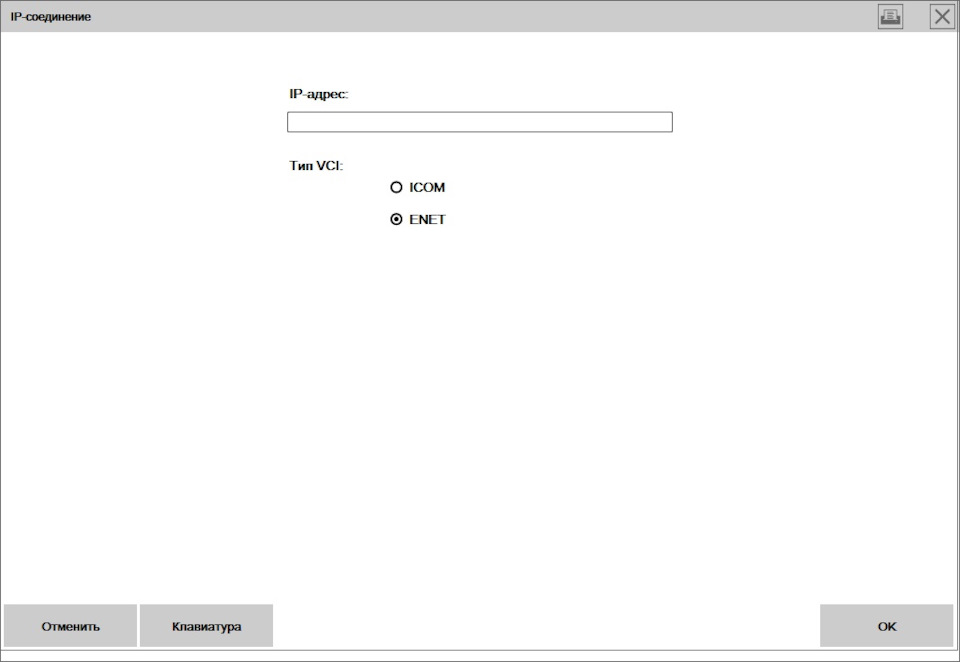
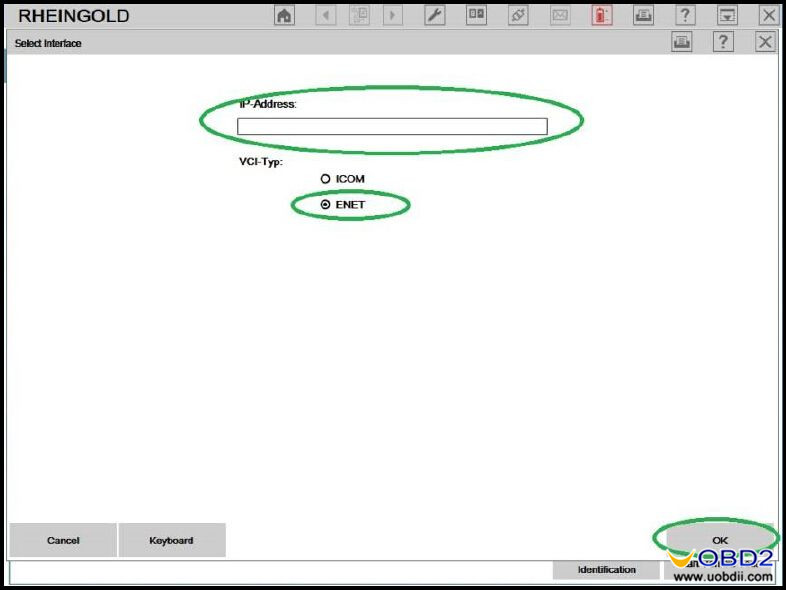
Собственно и все, читаем машину как обычно, но после нажатия Идентификации нужно будет выбрать ENET.
.jpg)
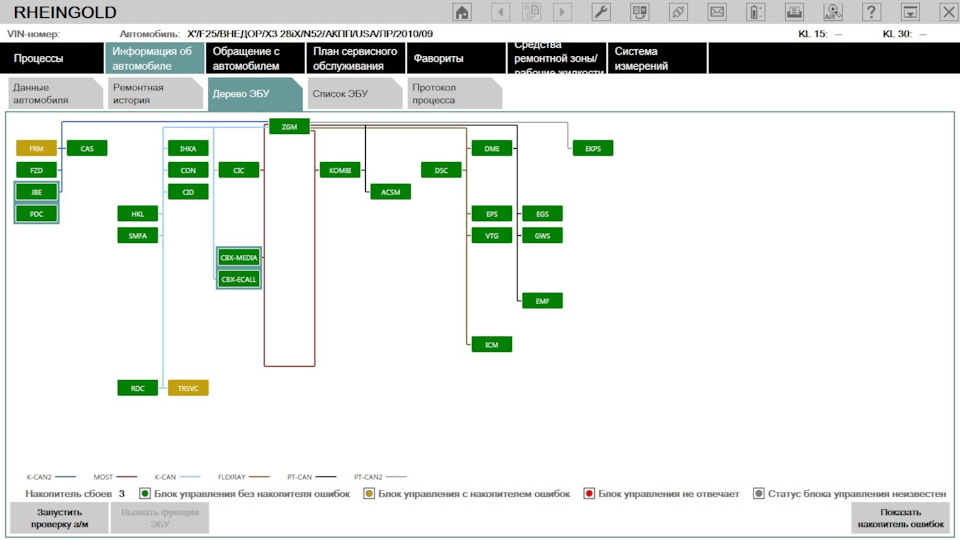
Все работает, все читается
.jpg)
Есть еще более простой вариант. Необходимо зайти в "Настройки \ Конфигурацию VCI" выбрать пункт "HO-ICOM / ENET локальная сеть"
Тогда при Идентификации будет выпадать "Менеджер соединений", в котором будет видна машина. После подключения кабеля к машине необходимо некоторые время, чтобы появилось соединение с машиной.
Here is a guide to show you how correctly connect and set up BMW ENET Cable with BMW ISTA Rheingold software! It is the first step to use this cheap BMW F Series coding cable instead of ICOM!
Preparations:

Step 1
Connect your laptop/PC with vehicle using the ENET cable.
After that, go to Control Panel→ Network and Internet→ Network Connections.
Select the Ethernet that is connected to the vehicle and open the Properties screen.
Select Internet Protocol Version 4 (TCP / IP) and click the Properties button.
Enter 169.254.1.1 for the IP address and 255.255.0.0 for the subnet mask then press the OK button.
Or if you install ISTA in VMWare, try this way:
Open Virtual Network Editor and disconnect form the host all adapters with Subnet Address 169.254.0.0. Uncheck the box “Connect a host virtual adapter to this network”.

Step 2
Turn on car ignition and run BMW ISTA Rheingold.
Click the Setting button as below:

Select “VCI Config” tab and “HO-ICOM ENET local and ISIS network” option, click the OK button.
Back to main menu and click the Operations button. Select “Read out Vehicle Data” tab and click “Complete Identification”.

Select your ENET connection from the list and click “Set up connection”.

And just wait the vehicle identification process complete!
Or here is another alternative way after you click the Setting button and select “VCI Config” tab:
Choose “HO-ICOM ENET direct connection” option and set ENET mode with empty IP-Address.
That’s all about how to set up BMW ENET cable with BMW ISTA. This guide is tested OK but not responsible for any potential lose or damage!
Ethernet to OBD2 (ENET) cable is a kind of hardware for change features on your F-Series vehicle when you using E-sys, Toolset32, ISTA P/D or any other BMW programming tool. Here I share my experience on how to build a bmw ethernet to obd2 cable step by step.And if you want to run BMW E-sys,read BMW E-sys 3.29.0 3.28.1 Coding Software Free Download to download.
Tools you need:
1.RJ-45 Crimping tool
5.welding soldering iron tool
6.510 ohm or 560 ohm 1/4 watt resistor
7.And any other material…
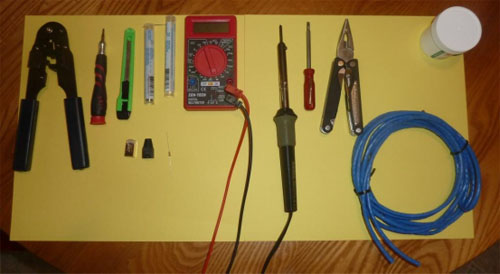
Above picture show the tools i use to make ENET cable.The only specialty tool is the network cable crimper. I’m using a simple and cheap multimeter to show that you don’t need anything special to test your cable. The only thing missing from the picture is the OBD2 Connector.
Here comes the guide on how to make ethernet to obd2 cable by yourself.
Step 1:First I test the resistor to make sure it doesn’t fluctuate all over the place. Solong as it sits stable between 506 and 560 ohms you are set.I use 510 ohm, 1/4 watt resistors, but other people have used 560 ohm, 1/4 watt resistors and been perfectly fine.

Step 2: Put on the RJ-45 boot and OBD2 connector cable protector. You don’t want to crimp the RJ-45 or solder your OBD2 connector only to find out you forgot to put these on the cable first.

Step 3:Preparation of the OBD2 connector. The connector below is how I receive them from China. I then add more solder to the individual pins by tinning each one (left connector). You can also see that there are numbers on the connector. This makes determining what pins your working with pretty much idiot proof. You could also feed the wires through the holes in the board and solder them to the pins on the other side. I don’t do this because it’s not as simple a process as soldering directly to the pins here.

Step 4:This shows the wires we’re going to be using to connect to the OBD2 connector. In this instance we’re using CAT5e cabling and I’ve already completed the tinning of the wires. You shouldn’t strip very much casing off the wires. I cut the unused wires at differing lengths to prevent shorting.
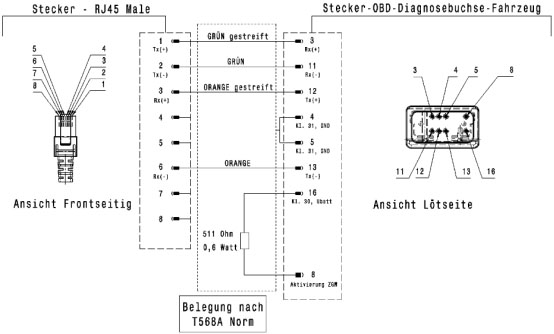
White with Green Stripe – Pin 3
Brown – Bridges Pins 4&5
White with Orange Stripe – Pin 12

I think the important thing is not to get wrapped up in the coloring. So long as you get the same wires connected between the OBD2 and RJ-45 you’ll be OK.
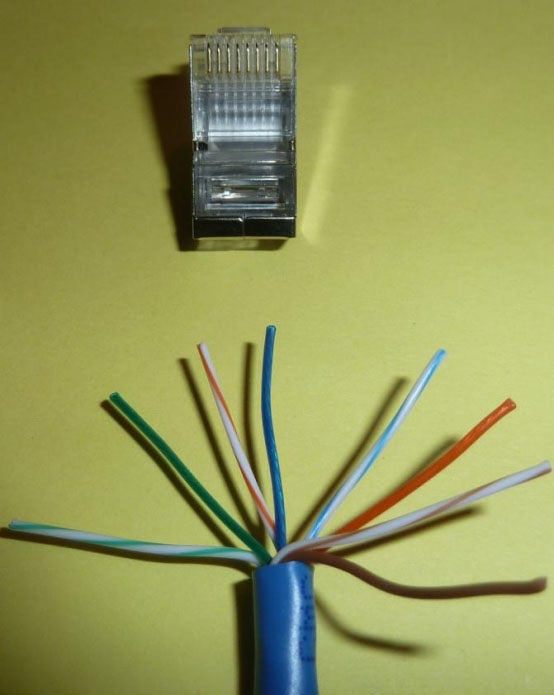
Step 5:Here’s the RJ-45 side. You’ll insert the wires into the RJ-45 with it positioned like itis in the picture.
White with Green Stripe – Pin 1 (Left Side)
White with Orange Stripe – Pin 3
Blue – Pin 4 (Unused)
White with Blue Stripe – Pin 5 (Unused)
White with Brown Stripe – Pin 7 (Right Side)
Brown – Left out of connector (See next picture)
Step 6:Here the wires are threaded into the RJ-45 but not crimped yet. You can see the brown
wire sitting outside of the connector. We’ll use this wire to ground the OBD2 connector
to the shielded RJ-45, which in turn will ground to the NIC casing and frame of your
computer or laptop. Many people ignore this step and their cables function just fine. I
just wanted to be sure I followed the schematic as closely as I can.

Here’s the completed RJ-45. The brown wire is soldered to the shielded casing of the
RJ-45 and ready to be covered by the connector boot.

Step 7:On to the OBD2 connector now. This is where the bulk of your soldering will be. You shouldn’t worry about your soldering skills because no one else is going to see your work. That and its going to be covered by the casing of the OBD2 connector. I’ve soldered on the 510 ohm, 1/4 watt resistor to connect pins 8 and 16 together.That was easy!

Here’s the brown (pins 4 & 5) and white with green striped wire (pin 3) soldered. They are connected on the RJ-45 side to the metal casing and pin 1 respectively.

Step 8: Alright, we’re almost there.Here’s the Green (pin 11), white with orange stripe (pin 12) and orange (pin 13) soldered.They are connected on the RJ-45 side to pin 2, pin 3 and pin 6 respectively.

Large picture of all the connections on the OBD2 connector side. I always add additional solder to the connections after initially connecting them to be sure there’s no way they will disconnect from everyday use. All you need to do now is use your multimeter to make sure you have good continuity in the wires between the OBD2 connector and RJ-45; and that the resistor is registering the correct ohm reading. See that was easy!

Last but not least here’s the finished connectors.
My final information is parts locations.
I get my resistors from a local electronics supply store, but you can get them from Radio Shack if you are in a bind. They are a standard resistor and are readily available in the US. If you are in Europe you should be able to source the 511 ohm, .6 watt resistors the schematic lists fairly easily. Since 510 and 560 ohm, 1/4 watt units work and I can get them by driving 15 minutes, that’s what I use. The shielded RJ-45s come from an online supplier. You can buy them in lots as small as 10 one eBay as well. You could also use a standard non metal cased jack. I exclusively use shielded jacks in the network cables I build so it’s an easy choice for me.

Finally, I get my OBD2 connectors from China through sellers on eBay. You are looking for a male connector. I haven’t had any quality problems with the connectors I’ve received but the shipping can take a while so be sure to take this into account. Do an eBay Search for: Universal OBD2 connector I’d post a link but they don’t last for long after an auction ends, so it would be a waste of time.
Подключаем кабель в машину в OBD2, а затем в ноутбук - в гнездо сетевой карты. Дальше открываем на ноубуке "Свойства сетевого подключения" и выбираем "Свойства" для "Протокол Интернета версии 4 (TCP/IPv4)".
Вводим в поле IP-адрес 169.254.1.1 и Маску подсети 255.255.0.0
Далее запускаем Rheingold и идем в Настройки \ Конфигурацию VCI.
Тип интерфейса выбираем HO-ICOM / ENET прямое соединение.
Собственно и все, читаем машину как обычно, но после нажатия Идентификации нужно будет выбрать ENET.
Все работает, все читается
Есть еще более простой вариант. Необходимо зайти в "Настройки \ Конфигурацию VCI" выбрать пункт "HO-ICOM / ENET локальная сеть"
Тогда при Идентификации будет выпадать "Менеджер соединений", в котором будет видна машина. После подключения кабеля к машине необходимо некоторые время, чтобы появилось соединение с машиной.
Читайте также: