
8227l recovery
Добавил пользователь Владимир З. Обновлено: 19.09.2024
Окирпичил свою магнитолу на третий день владения в попытках получить рут-права. Абсолютно никакой информации на просторах интернета о магнитолах на T3-P1 с Android 8.1 с завода. Китаец, естественно, опрокинул с поддержкой и я бросился во все тяжкие. Целая неделя нервотрепки, сломанный тачскрин ввиду многократных разборок/сборок магнитолы для пробы прошивок. И теперь я готов предоставить свой вариант загрузочного образа для PhoenixCard, который вновь оживил мою магнитолу. Но обо всем по порядку.
Как всё начиналось
Попытался получить рут путем прошивки SuperSU через рекавери переименовав его в os_update_*.zip. Он успешно прошился, но магнитола словила бутлуп. Действовал на тот момент я так смело потому, что имел свою оригинальную прошивку os_update_XWQC01D1-O55‑1.0.4.3.1_20190715_204335_b1.zip. Ведь что может пойти не так? Ну сломал ведро, зайди в рекавери да накати по новой раздел /system и /vendor. А вот здесь начались сложности.
Сначала я шел от банального: пробовал всевозможные комбинации с кнопкой Reset (единственная физическая кнопка на данной магнитоле), но не похоже, что она имеет какую-то программную обработку. Скорее всего она задействована на банальный разрыв питания магнитолы.
Затем на ютубе нашел ролик, в котором на первый взгляд аналогичная внешне магнитола, с таким же точно лаунчером. В нем автор демонстрирует способ перезагрузки в рекавери через зажатие кнопки Reset, пока не начнет мигать подсветка сенсорных кнопок, и после нажать 3 раза Reset одновременно с тиками подсветки. И что странно, мне этот способ не помог — магнитола по прежнему мгновенно перезагружается при касании Reset’a. Из этого делаем вывод, что абсолютно одинаковые внешне магнитолы (даже программно) могут иметь абсолютно другое железо внутри.
На 4pda вдоль и поперек изучил три имеющиеся темы по магнитолам на T3 (он же sun8iw11p1). Там популярен способ с зажатием трех клавиш на внешней USB-клавиатуре, а именно: ALT + PrintScreen и спамить клавишу I. Бесполезно, на момент бутлоадера, ю‑бута, ядра и затем даже той части загрузки андроида до бутлупа клавиатура просто напросто не работает. В последствии, когда я перебирал всевозможные прошивки для феникса от совсем разных магнитол, на одной из них я все таки смог воспользоваться этим способом, так что он тоже слишком ситуативный.
Я уже начинал отчаиваться, умолял китайца выслать прошивку для феникса или хотя бы поделиться комбинацией для загрузки в рекавери. Китаец, естественно, отморозился и на связь выходить перестал.
Поняв, что терять нечего, я полез разбирать магнитолу в поисках хоть какой-нибудь зацепки: модель платы, каких-нибудь модулей или еще что-нибудь, что можно вбить в поисковик и найти магнитолы со схожим железом и готовые решения для них.
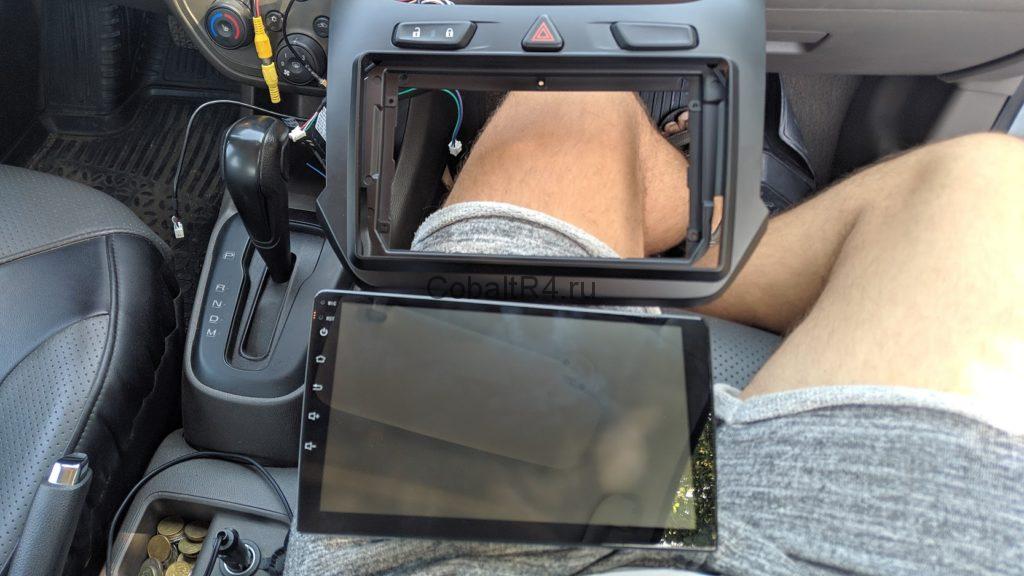
Снимаем декоративную рамку, ради которой приходится покупать эти богомерзкие магнитолы без поддержки
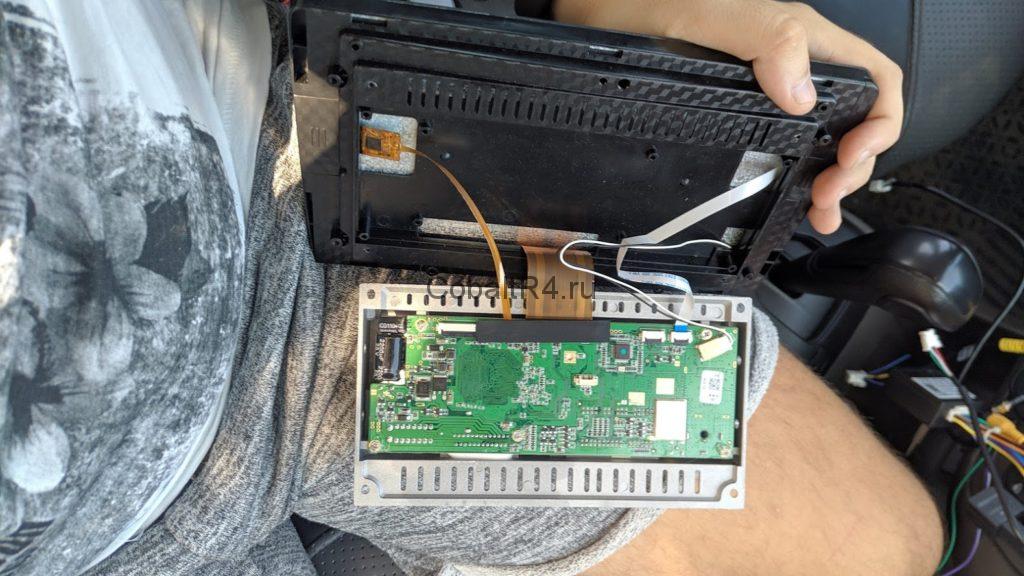
Видим, что исполнение одноплаточное: Android-составляющая, MCU, питание и усилитель размещены вместе, без модулей как привычно для многих других магнитол. А это уже тревожный звоночек. Но как было сказано ранее, терять нечего и разбираем дальше.

К моему огромному ВЕЗЕНИЮ обнаруживается распаянный слот MicroSD на обратной стороне платы, закрытый радиатором. Как известно, аварийный способ восстановить прошивку на всех AllWinner — это создать загрузочную флешку с помощью программы PhoenixCard и образа .img, который состоит из разметки разделов (sys_partition.fex, dlinfo.fex, sunxi_mbr.fex), boot0 загрузчика (boot0_nand.fex, boot0_sdcard.fex), boot1 загрузчика (он же — u‑boot.fex, который в свою очередь запакован в boot_package.fex), параметров запуска ядра (env.fex), раздела /bootloader (boot-resource.fex, содержит в себе MAGIC.BIN и изображения загрузчика), ну и привычные для андроида boot.fex, recovery.fex, system.fex и в случае восьмой версии ведра vendor.fex. По сути, имея такой слот на магнитоле и прошивку для своей модели, можно не бояться программных экспериментов, ибо прошивка фениксом это самая что ни на есть полная переразметка всей NAND с последующей перезаписью данных.
Но прежде чем начинать радоваться, нужно было убедиться, что этот слот действительно загрузочный. Обычно в магнитолах на AllWinner два MicroSD слота, и только один из них используется как загрузочный. Неизменный загрузчик, с которого начинается запуск всегда в приоритете пытается выполнить загрузку с MicroSD карты, и затем, не обнаружив её, уже переключается на NAND.
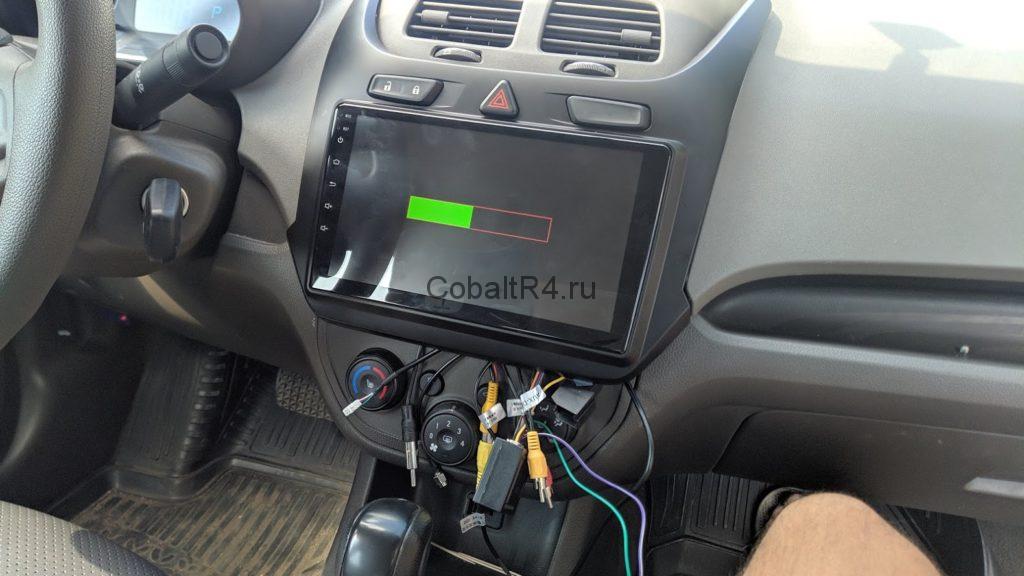
Слот загрузочный, процесс пошел. Не смотря на вопли в топике по ссылке выше о том, что T3-P3 и T3-P1 не взаимнопрошиваемы, система всё таки загрузилась:
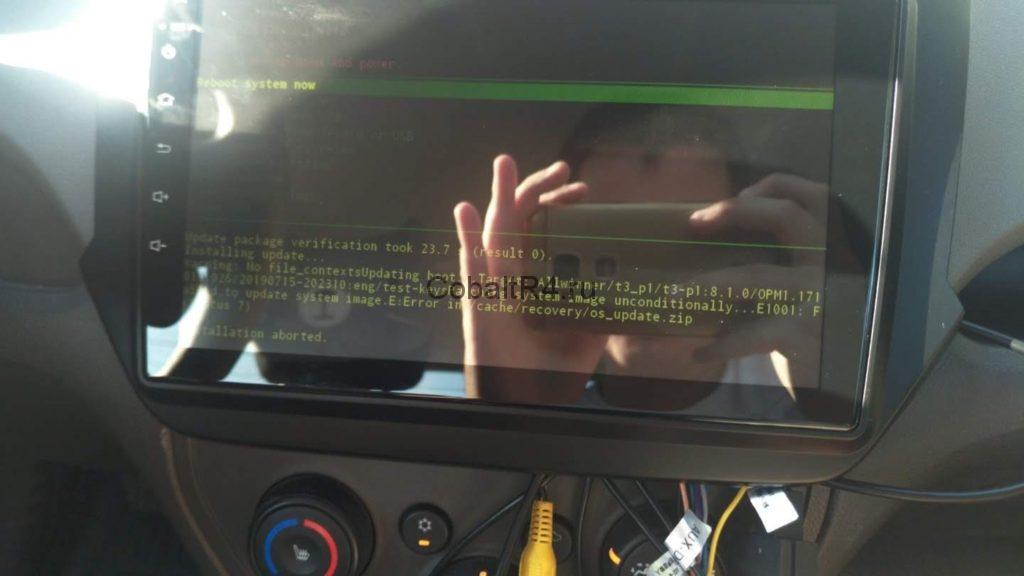
Но сразу же бросается в глаза, что абсолютно ничего больше не работает. Слава Богу, что хотя бы сам андроид стартанул. Не было ни блютуза, ни вай-фая, ни радио и естественно отсутствовал звук. Версия андроида не принициальна, как и внешний вид лаунчера, после нескольких дней езды с кирпичом вместо новенькой магнитолы хотелось любой работоспособности. Но её не было, и потому сразу была предпринята попытка прошить имеющийся zip для рекавери от китайца с оригинальным восьмым андроидом. На тот момент я еще не знал, что в восьмом андроиде иная таблица разделов, и самое основное изменение — это раздел /vendor, вместо которого раньше был симлинк /vendor -> /system/vendor. Естественно, не было никаких шансов накатить восьмой андроид на седьмой, даже если бы рекавери прошил ядро, оба загрузчика и раздел /system, без /vendor система бы не загрузилась:
И в голову сразу же пришла другая идея: отталкиваться от того, что работает на данный момент. С помощью ImgRePacker и параметра /noiso извлек работающую семерку и получил папку YMHC0101-N39‑1.5.4.2.5_20171212_152614.img.dump. Не имея ранее опыта сборки прошивок, и тем более никогда не юзав устройства на AllWinner, было потрачено достаточно времени в понимании устройства образа прошивки для феникса. Первоначально я хотел просто добавить недостающие разделы, которые появились в восьмом ведре: vendor, dto вместо alog и media_data.
Имейте в виду: размер в sys_partition.fex указывается в так называемых секторах, где 1 байт равняется 2 секторам. Указывая конкретный размер раздела, не забудьте его умножить на 2.
Если раздел будет меньше, чем заливаемый в него образ, то процесс прошивки с флешки магнитолы зависнет примерно на середине зеленого прогресс бара. Не забываем увеличивать размеры имеющихся разделов в соответствии с размерами образов.
А так же порядок партиций в данном файле напрямую определяет, какими они будут в mmcblk0p*:
Первая запись в файле будет разделом mmcblk0p2
Вторая запись в файле будет разделом mmcblk0p5
Третья, четвертая, пятая, … — mmcblk0p6, mmcblk0p7, mmcblk0p8
И дальше в обычном порядке, но при этом UDISK всегда получает mmcblk0p1.
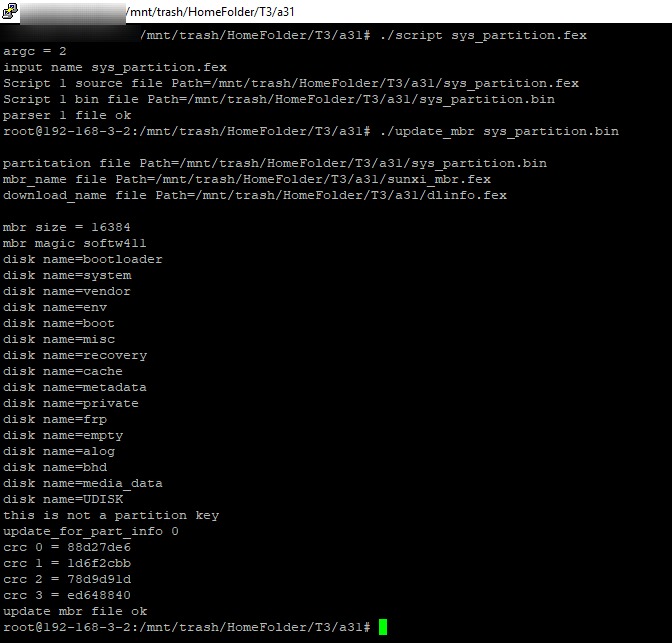
Бинарник sys_partition.bin нам не нужен, а вот оставшиеся два файла скидываем обратно в дамп распакованной img прошивки. dlinfo.fex содержит в себе информацию о заливаемых образах разделов в NAND. sunxi_mbr.fex, как можно догадаться из раздела, MBR для нашей mmcblk0.
Не изменяя ничего более, я собираю дамп обратно в .img всё той же программой и заливаю образ через феникс на флешку. Прошиваем, система успешно грузится. Отлично, значит таблицу разделов мы можем менять как нам захочется. Делаем рут и проверяем что получилось:
Бинго, вот и vendor в седьмом андроиде. Сразу же стало очевидно попытаться dd’шкой загнать образы разделов прям с работающей системы. Для этого вернемся к нашему zip архиву с восьмеркой и вытащим из него все возможное:
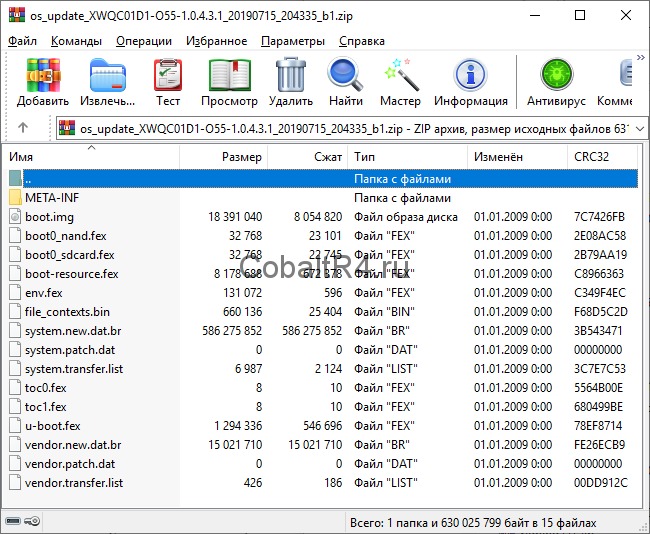
Что мы имеем? А имеем мы, не смотря на внешний вид а‑ля OTA обновление из-за патчей system и vendor, полноценную систему. Разбираем содержимое архива:
- boot.img - ядро андроида, при встраивании в образ для феникса просто переименовываем в boot.fex
- boot0_nand.fex и boot0_sdcard.fex - boot0 загрузчик для типов памяти сооветственно, копируем без изменений
- boot-resource.fex — образ раздела /bootloader в файловой системе FAT16, копируем как есть
- env.fex - параметры запуска ядра, если распаковать, то получим следующее содержимое:
- file_contexts.bin — список пермишинов selinux для файлов, не используется в нашем случае
- system.new.dat.br, system.patch.dat, system.transfer.list — раздел /system. Сначала необходимо пройтись по файлу .dat.br утилитой Brotli.exe, получим system.new.dat, который вместе с двумя остальными файлами кидаем в директорию Input-DAT программы Auto Tool Unpack Repack .DAT & .IMG For Windows. Выбираем первый пункт, ожидаем завершение процесса и в корне программы обнаруживаем наш полноценный образ system.dat.img. С помощью img2simg.exe можно сжать файл за счет удаление свободного пространства, которое в изначальном файле представлено нулями. Я этого делать не стал, потому что опасаюсь, что без нулей образ не покроет полностью соответствующий раздел в NAND. Полученный файл переименовываем в system.fex и бросаем в наш дамп
- toc0.fex и toc1.fex — копируем без изменений
- u‑boot.fex - не смотря на аналогичное название файла файлу в дампе, они отличаются. А вот с файлом boot_package.fex у них полное совпадение, потому переименовываем u‑boot из архива zip в boot_package.fex и заменяем. Это первое. Второе: данный пакет содержит в себе в том числе и u‑boot.fex для img образа феникса. Любым удобным HEX-редактором открываем файл и видим следующее:
Это своего рода пакет-склейка нескольких файлов: u‑boot, optee, soc-cfg и еще не влез dtb конфиг. Видим, что нужный нам u‑boot идет первым, а за ним следует optee. Значит, в начале файла обрезаем всё вплоть до 8E 01 00 EA 75 62 6F 6F 74, что соответствует строке kuboot. Теперь наша задача определить конец юбута, для этого вернемся к структуре пакета на скриншоте выше и видим, что за юбутом следует optee. Вбиваем в поиск (не HEX) название optee и находим его начало:
Наблюдаем ярко выраженную границу двух файлов, потому сразу после множества FF FF FF … FF обрезаем наш boot_package до самого конца. Получившийся файл сохраняем как u‑boot.fex в дамп для феникса. Еще раз: из одного файла u‑boot.fex из зип архива мы получаем два файла boot_package.fex и u‑boot.fex для img дампа феникса. - vendor.new.dat.br, vendor.patch.dat, vendor.transfer.list — по аналогии с system.new.dat.br. Только стоит учесть, что программа Auto Tool Unpack Repack .DAT & .IMG For Windows на вход принимает файл строго с названием system.new.dat.br, поэтому все три файла переименовываем из vendor в system, а затем полученный образ обратно в vendor.fex и бросаем в дамп феникса.
Возвращаемся к ImgRePack, теперь уже запаковываем дамп обратно в img, введя название папки YMHC0101-N39‑1.5.4.2.5_20171212_152614.img.dump и параметр /noiso. Получаем образ, который с помощью PhoenixCard записываем на флешку и идем прошивать магнитолу.
Но ничего не получалось, как я не комбинировал работающий седьмой андроид и имеющийся архив для рекавери с восьмеркой — получал либо черный экран, либо артефакты вместо изображения. Пробовал всякое, курил кучу тематических форумов, но ничего не помогало.
И вот вчера в теме на 4pda ув. ahmed68 выложил полный образ восьмерки для феникса. Естественно, я сразу побежал его прошивать, но прошивка даже не стартовала. Просто черный экран при включении магнитолы с подключенной флешкой MicroSD. Я начал заменять в ней файлы по одному своими из zip архива, естественно начиная связанных с загрузкой, ибо ни ядро, ни разделы самого андроида очевидно не влияют на процесс прошивки. И когда список замененных файлов был следующим: boot_package.fex, boot0_nand.fex, boot0_sdcard.fex, boot-resource.fex и u‑boot.fex прошивка таки пошла. И даже больше: появилась загрузочная картинка из /bootloader. Это был прогресс на фоне всех моих ранних мучений.
Естественно, я сразу же заменил и оставшиеся разделы андроида, но загрузка так и не пошла. Даже больше: при замене boot.fex ядром от моего восьмого андроида, загрузка начала прерываться ежесекундной перезагрузкой. Причину, по которой содержимое моего архива не хотело грузиться я не знаю. От безысходности я решил попробовать повторить аналогичное, но с другим архивом: os_update_KC1C01W1-O01‑1.0.4.3.1_20190424_192823_b1.zip. Внутри такой же андроид 8.1, настоящий, не переименованный в build.prop. Но с лаунчером не как у нас, а как и в ранних прошивках KC1C0101, только с андроидом 7.
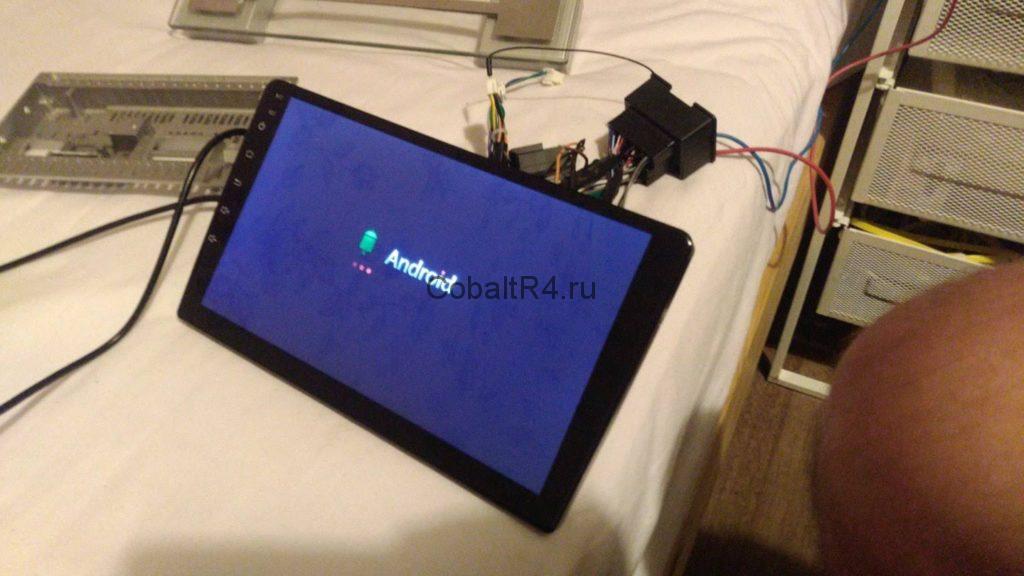
И всё, появилась бутанимация восьмого ведра:
А затем и лаунчер от KC1C0101:

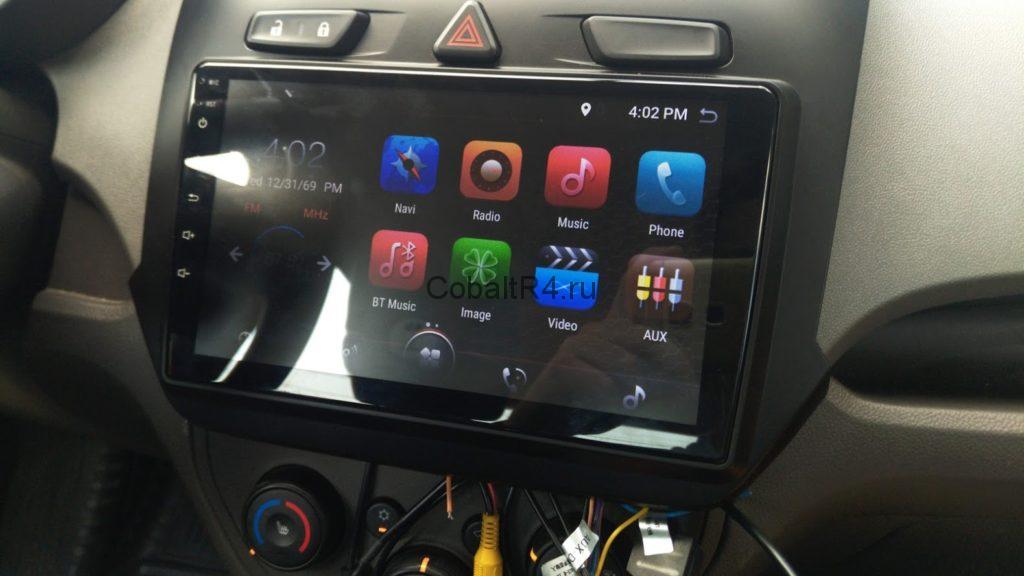
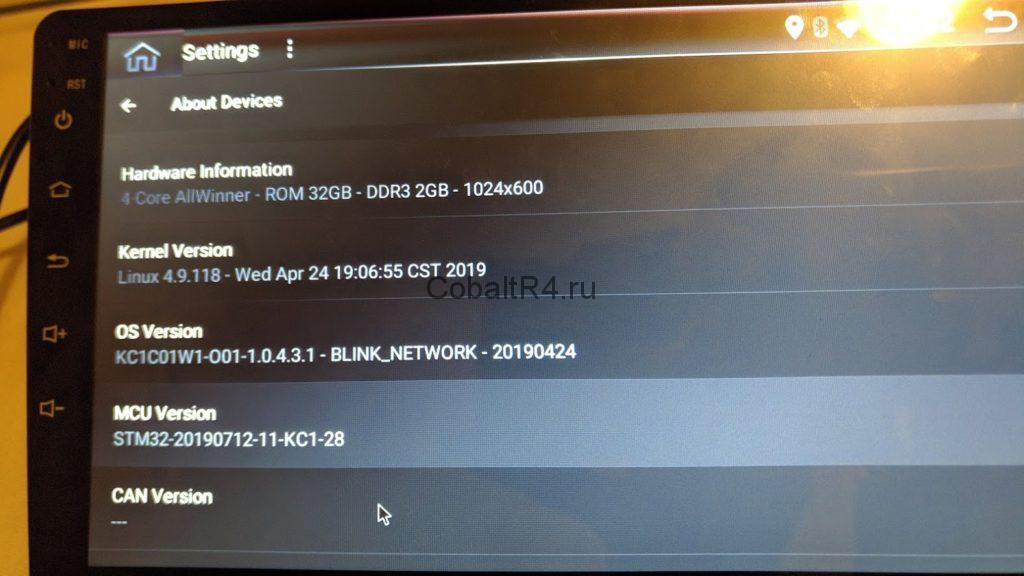
Сразу в глаза бросилась иконка Wi-Fi, и не зря: он заработал. Так же, как и всё остальное. Появилось радио, начали сохраняться настройки эквалайзера. Блютуз снова находит другие устройства. MCU не менял, прекрасно работает и с моим июльским, хотя прошивка апрельская:
Прикладываю разметку разделов, на которой 100% восьмой андроид грузится. Да, тут есть лишние разделы, но они не мешают и я их оставил прозапас:
Не знаю, связано ли это с последней прошивкой от ув. ahmed68 или же мне сразу стоило пытаться накатить KC1C01W1-O01, а не мучиться с моей оригинальной. Но в любом случае магнитола снова работает, чему я безумно рад. Естественно, сразу же сделал рут, с чего это приключение и начиналось. Пропатчил ядро boot.fex с помощью Magisk Manager и собрал архив .zip для прошивки через рекавери. Переименовал его в os_update_kernel.zip и прошил обычным путем через юсб-флешку на работающей системе. После этого остается поставить Magisk Manager из apk и доустановить рут.
Образ для феникса:
Единственный PhoenixCard, который у меня смог без ошибок записывать образы на MicroSD-карты:
Пропатченное ядро для рута, кинуть на юсб-флешку и выбрать для прошивки в интерфейсе системы:
Для сравнения устройства с конкурентами и по вопросам выбора устройств обращайтесь в тему: Помощь в выборе
Помогите опознать ГУ, помогите найти прошивку!
Данная тема является логическим продолжением основной темы с андроидом 6.0 : при поиске решений смотрите и её.
Операционная система: Android 8.1 версия API 27
Процессор: АС8227L 4 ядра 1,2 ГГц
Оперативная память: 0.75 ( :) ) , 1 , 1.5 , 2 Гб
Встроенная память: 16(?)/32 Гб
Размер дисплея: 7"/9"/10"
Разрешение дисплея: 600*1024
Тачскрин: емкостный
Усилитель (УНЧ): TDA7388/AC7315
Выходная мощность: 4*60 Вт
WiFi: ЕСТЬ
BT: ЕСТЬ (работает как гарнитура; подключение OBD сканера)
USB: 2шт
Разъем для MicroSD: НЕТ (в FAQ описана возможность установки)
GPS: ЕСТЬ
AV-Out (подключение к монитору подголовника)
Подключение камеры заднего вида: ЕСТЬ
Язык интерфейса: английский, русский, немецкий, французский и другие 50 языков.
В: Как подключить ELM327?
О: Ответ в посте
В: Как включить разделение экрана на прошивках с ОС android 8.1?
О: Ответ в посте
В: Почему звук только в радио?
О: Не правильно подключено управление включением внешнего/штатного усилителя.
При прошивке 8.1 на 8.1 - ПРЕЛОАДЕР НЕ ШИТЬ.
Вся информация по работе с флештулом (прошивка/дамп) есть в основной теме (6.0) и в теме самого SP флештула.
Ошибка 1011 : заменить в прошивке блоки cache и userdata на чистые.
Переход с 6.0 на 8.1 осуществляется : 1.при наличии полного дампа на 6.0 для отката. 2.прошивка своей версии флештулом в режиме "format all+download" - галки стоят на всех блоках (т.к. переразбивается память). 3.если версии устройства 1/16 или 2/16 - могут иметь не рабочий twrp, то возможно потребуется поверх своей прошивки залить прошивку от версии 2/32 с заменой рекавери на twrp и без прелоадера в режиме "download".
Переход с 8.1 на 6.0 (откат) осуществляется заливкой полного дампа или заливкой прошивки собранной из полного дампа в режиме "format all+download" (т.к. переразбивается память).
Просьба к тем , кто собирает и выкладывает моды прошивок , патчи приложений и т.п. - офомляйте отдельные , обновляемые посты под свои разработки. Описание модов , патчей - приветствуется.
Все вопросы по модам , патчам - желательно адресовать в личку авторам.
Дмитрий 47, я чуть выше написал косяки.
1 в приложения навигации янави не попал, там вообще нет приложений далее Гугл родного. Навител не ставил, считаю его мертвым уже давно для себя. Но янави не приглушает ни радио ни плеер, просто ставит на паузу и все только руками запускать.
2 эквалайзера два и новый и старый они криво совместимы или нужно старый убрать вообще , знаю как но мне нужны права( и в новом куча ползунков громкости но все они схлопываются в одну громкость. Например ГИС не получается добавить.
3 радио не переключается на внешний чип (
Плюсы, быстрая грузит быстрее. Работает шустро.
Подсветка кнопок больше не приглушает экран как будто ночь, можно оставить теперь гореть всегда)
Без рут мало могу проверь
Здравствуйте и приятно помочь вам с этим устройством.
для меня на данный момент я вижу что-то странное, есть 2 разных lk.bin
первый на начальном дампе и новый, созданный при сбросе после сброса настроек.
Первоначальный дамп хорошо работает с USB-флешкой и без USB-MTP при подключении к ПК, но теперь с новым lk из заводского сброса.
Я не могу использовать USB-флешку на 2 USB-порта, и при подключении USB с 4-контактным к ПК подключено устройство MTP.
tried lk.bin from initial dump and no change for me usb key and dash cam doesn't work
Thanks everyone who contributed in my effort to fix my bricked device. Here is all that I have found useful in successfully reviving my device.
The files shared here are the ones that worked on my unit (see specs and pictures below) If your device is different, it may or may not work.
If the device has dedicated radio chip inside, the Firmware number will show as YT9218, if no radio chip, then it will show as YT9217
Note: if your device is not bricked, Make a full backup before trying another firmware.
Memory dump:
firmware 20181222 HiFi: (Link) (thanks mazepa2000) (May 2019 update below)
Rooted TWRP firmware 20190523 HiFi: (Link)
Preloader (Boot_1) from other Similar Firmwares: (Link)
Download the one similar to your device's version.
Firmware via flash tool: Rooted TWRP 20190523 (Link) Thanks Maxkir
(You may need to remap side touch buttons in Factory settings (code 8888) -> Touch settings -> Click start -> Name of the button -> The button itself ->Repeat for all the buttons -> close -> ok).
Firmware for YT9213 Device: (Link) (Thanks pajurpl)
Update / Upgrade Files USB flash drive:
Firmware 20190522 HiFi: (Link) (Thanks foxgiggle , iSevenAuto)
Firmware 20190906: (Link)
Memory Dump Procedure via flashtool:
(Memory dump is only needed if you need full recovery from a backup. Otherwise you may only need to do the next part.)
Download and install MTK drivers. (Link)
Load scatter file and preloader (Link) in spflashtool. Press Ctrl Alt V , then go to Window and select "write memory". In file path select "user", in begin address put 0x0, In Region select the partition named "EMMC_USER". Hit Write memory. After that plug in the usb cable (connected to usb1 port). If the device is not detected, you need to power it on. If still not detected then you might need to short the two test points (see picture) (without power this time) and then plug in the usb cable. Remove the short when write process starts. Check if the issue is fixed. If its not fixed, then do the same to write boot2 and boot1 partitions as well. You may need to download Boot_1 specific to your original firmware from the link above.
Uploading Firmware (full or parts) via flashtool:
If you are uploading the firmware available in parts, you only need to upload "BOOTIMG" and "ANDROID" (SYSTEM).
You may also need to flash "RECOVERY". Remember to uncheck the preloader. Here is a nice instructions file. (Link) (thanks Maxkir)
There is more info and firmwares to chose from at 4pda forum.
Update / Upgrade Procedure via USB flash drive:
Copy the zip file (do not extract) to usb drive or microSD card, (formatted by SD Card Formatter). Connect to usb port 1 or 2. Go to Car Settings, System info. Click Android Upgrade.
--OR--
Extract the zip into a folder named XYAUTOUPG into the flash drive or microSD card, connect to usb port 1 or 2 and then reboot. Upgrade should start automatically. You might need to try with different USB drives or sd cards. For some reason this only works with certain usb and cards.
MCU Upgrade Procedure via USB flash drive:
Extract the mcu file into flash drive or microSD card. Connect to usb port 1 or 2. Go into system info and update mcu.
Make a Full Backup/Memory Dump:
Open SPFlashtool, Select Memory Test Tab, Select only RAM Test (uncheck the rest), push start, and connect the unit. Save the information appeared, in a text file for later. (Read above "Memory dump procedure" for the usb connection setup).
Now go to ReadBack Tab, Double click on empty space next to tick mark, Select a folder where you want to store the dump file, and Type a name for the dump file you are going to creat, (ie. Boot_1, Boot_2, USER). Click Save. In next window "Readback block start address", select the region you want to make backup of (ie. EMMC_BOOT_1, EMMC_BOOT_2, EMMC_USER).
Start address is 0x0000000000000000
Length copy and paste from the text file you created earlier.
typically for Boot_1 and 2 the length is 0x0000000000400000
and for USER (16GB models) the length is 0x00000003a8000000
Click OK.
Now click on Readback and then connect the unit via usb cable. and Read process will start.
Do the same to make backup of all three partions. USER will take long time because its the largest partition.
RDS FM Radio:
Radio app with fixed RDS, channel names on buttons and HiFi: (Link) (thanks sjguk)
Copy to FMRadio directory, rename to FMRadio.apk and change permission 764. (or 755 ?).
Channel name Editor: (Link) (thanks mclaught)
install as normal. You may need to install GalaPublicResources. Click top right dots.
Multi Window Mode:
Go to root folder, look for build.prop. Open in text editor. Change the line ro.build.type=user to ro.build.type=userdebug.
If no such line is there, then simply add the line at the end. Save and exit. Go to Android settings, Developer options, look for multi window mode and enable it. Swipe down from the top of the window, Click on recent apps tile. You'll see the new multi window option there.
Subwoofer output Pin:
The default AUX_out pins are for mid range audio and is controlled by Mid slider in the mixer. The subwoofer output is on another pin (See Picture).
it is easy to remove one of the AUX_out pin and install it at the Sub output. this pin is controlled by Subw slider in the audio mixer.
Launchers UI1, UI2, UI4 (Link), UI5 (Link) (Thanks Maxkir)
Boot animation: (Resolution is 1024x600)
eg. (Link)
The animation preview didn't work for me, but I installed it anyway and it worked fine.
OBD Dongle Bluetooth Setting:
Open Bluetooth app, Click on settings, tap on the pin code "0000" and type in "1234" instead. Save settings.
Now search and connect the OBD dongle normally.
Unit Specs:
motherboard marking YT9217 VER1.5 XY AUTO also 9218 VER2.4 XY AUTO near the antenna
Model no 8227L_demo android 8.1
Android YT9217C_00005_V003_20191402_HIFI
Kernel 3.18.22
DDR 1GB FLASH 16GB
CPU A7 1.3GHzx4
Amplifier AC7315 mos bile duct 45Wx4
AutoChip ARM AC8227L
Mediatek MT6323LGA
Kingston EMMC 16G
Download a different Boot_1 or preloader file from the 4pda forum. Also, try different scatter files.
Try to look for files matching your device.
try loading the oldest 2018 firmware (1st link) if nothing else works.
it will eventually work.
markohye
Member
wooldogsinc
Senior Member
I decompiled apk via online tool, which worked well for xml files but it didn't give me any java files
pajurpl
Member
In the end I was able to upload
After a few hours of torment, my beloved radio managed to put me on my feet.
I uploaded with preloader selected because I had a brick (black screen) radio and it didn't turn on. If your radio has no brick, uncheck the preloader when downloading the firmware.
No power supply needed for uploading, just usb (4pin)
Below full firmware with preloader and scatter full firmware package YT9213A_00009_V001_20191126 ready to be uploaded by SP Flash Tool.
Below the upload instructions are recorded quickly.
I saw that someone above was also looking for a preloader for this model should definitely be useful.
YT9213A_00009_V001_20191126 (Link)
Instruction Video (Link)
Update:
We also managed to upload "Memory Dump Rooted TWRP firmware 20190523 HiFi" from the first post after creating the ready firmware to be uploaded by Download options in SP Flash Tool as above of course with uncheck preloader
Rooted TWRP firmware 20190523 HiFi (Link)
wooldogsinc
Senior Member
Anyone able to get maps go and navigation for go working on their radio? They both installed fine.
Issue is there is no navigation button.
Good lightweight google maps for devices with 1gb.
pajurpl
Member
Anyone able to get maps go and navigation for go working on their radio? They both installed fine.
Issue is there is no navigation button.
Good lightweight google maps for devices with 1gb.
wooldogsinc
Senior Member
Thanks for testing. Yes, that app should enable the navigation button. From reading its an issue with landscape devices. Need portrait, then go back to landscape. I tried the rotation app but couldn't enable portrait. Also enabled all the permissions in settings.
viktorsaari
Senior Member
I did just that, and the yes the "mclaught" app unpacks to Sources and Resources. But when I unpack my original app, it only unpacks to Resources folder.
The app from mclaught does not allow for custom background image. And honestly, I like the style of my previous app. I had made custom adjustments in it. Therefore I made the necessary adjustments for the Station name display in my own app. but can't modify the hifi issue because it doesn't unpack the Sources.
abdollahimo
Member
Hi guys my device is yt9218dh_adh with dsp unit running on android 8.1
Mcu is 3.1
8227L
I want to update it to android 9
First I download the zip file with 2 files inside it .bin & .upd
The button on system info is disable and cannot be used for update
How can I update this device with USB?
I put the files in root of pendrive also put them on xyautoupg folder reset the device use both USB connectors nothing happen
Can anybody help me ?
And where do I have to download android 9 firmware for this device
Attachments
emta43
Member
YT8216B and STM32 chipset
I did just that, and the yes the "mclaught" app unpacks to Sources and Resources. But when I unpack my original app, it only unpacks to Resources folder.
The app from mclaught does not allow for custom background image. And honestly, I like the style of my previous app. I had made custom adjustments in it. Therefore I made the necessary adjustments for the Station name display in my own app. but can't modify the hifi issue because it doesn't unpack the Sources.
Hello all,
ive bought the unit and Ive decided for the following:
- radio app with RDS
- change the microphone due to bad outcoming call quality
- to recieve the full access and ROOT
- add the active antenna adapter to improve radio reception
I no in the TRAP with the first point:
I have the image, but Im not able to connect to the device:
1) SP flashtool and USB
- all MTK drivers installed correctly under WIN0
- new A-A cabel
- tested with POWER OFF and POWER ON, all USB options checked in the device - NO PROGRESS (seems like the USB is power supply only)
2) ADG and WIFI
- tested all possible hints how to connect
adb kill-server, adb tcpip 5555, adb connect.
PING is working, but with adb connect the device will refuse the connection with code 10061
3) SD card
visible in the device, possible play the music
any zip as update is ommited during the device start
4) SP flash tool and short TEST POINTs
What was the function of the pins in the first post?
Any Idea which pins can I try?
Ive found in the FACTORY SETTINGS the menu UPDATE, unfortunatelly all options are in chinesse? (Picture 3)
Thank You for any hnts, proposal etc.
Attachments
wooldogsinc
Senior Member
viktorsaari
Senior Member
Attachments
khalil03
Member
Hi, I have this problem. Side keys do not light. Maps application microphone does not work. No microphone sign on keyboard.
wooldogsinc
Senior Member
Attachments
viktorsaari
Senior Member
Hi guys my device is yt9218dh_adh with dsp unit running on android 8.1
Mcu is 3.1
8227L
I want to update it to android 9
First I download the zip file with 2 files inside it .bin & .upd
The button on system info is disable and cannot be used for update
How can I update this device with USB?
I put the files in root of pendrive also put them on xyautoupg folder reset the device use both USB connectors nothing happen
Can anybody help me ?
And where do I have to download android 9 firmware for this device
Don't worry about Android 9. its not even 8.1 underneath. its all just fake numbers :laugh:
If it's working fine, then don't need do nothing. :silly:
viktorsaari
Senior Member
pajurpl
Member
Mod wifi antenna
Attachments
wooldogsinc
Senior Member
I did just that, and the yes the "mclaught" app unpacks to Sources and Resources. But when I unpack my original app, it only unpacks to Resources folder.
Not the best place. Get this cable. And run it in a trim panel like above the front windscreen. Better signal there rather than inside an enclosed space.
pajurpl
Member
Similar threads
Breadcrumb
Top Liked Posts
ROM / Firmware/ Brick Recovery for 7" Android Head Unit AC8227l YT9217 YT9218 1/16GB
Thanks everyone who contributed in my effort to fix my bricked device. Here is all that I have found useful in successfully reviving my device.
The files shared here are the ones that worked on my unit (see specs and pictures below) If your device is different, it may or may not work.
If the device has dedicated radio chip inside, the Firmware number will show as YT9218, if no radio chip, then it will show as YT9217
Note: if your device is not bricked, Make a full backup before trying another firmware.
Memory dump:
firmware 20181222 HiFi: (Link) (thanks mazepa2000) (May 2019 update below)
Rooted TWRP firmware 20190523 HiFi: (Link)
Preloader (Boot_1) from other Similar Firmwares: (Link)
Download the one similar to your device's version.
Firmware via flash tool: Rooted TWRP 20190523 (Link) Thanks Maxkir
(You may need to remap side touch buttons in Factory settings (code 8888) -> Touch settings -> Click start -> Name of the button -> The button itself ->Repeat for all the buttons -> close -> ok).
Firmware for YT9213 Device: (Link) (Thanks pajurpl)
Update / Upgrade Files USB flash drive:
Firmware 20190522 HiFi: (Link) (Thanks foxgiggle , iSevenAuto)
Firmware 20190906: (Link)
Memory Dump Procedure via flashtool:
(Memory dump is only needed if you need full recovery from a backup. Otherwise you may only need to do the next part.)
Download and install MTK drivers. (Link)
Load scatter file and preloader (Link) in spflashtool. Press Ctrl Alt V , then go to Window and select "write memory". In file path select "user", in begin address put 0x0, In Region select the partition named "EMMC_USER". Hit Write memory. After that plug in the usb cable (connected to usb1 port). If the device is not detected, you need to power it on. If still not detected then you might need to short the two test points (see picture) (without power this time) and then plug in the usb cable. Remove the short when write process starts. Check if the issue is fixed. If its not fixed, then do the same to write boot2 and boot1 partitions as well. You may need to download Boot_1 specific to your original firmware from the link above.
Uploading Firmware (full or parts) via flashtool:
If you are uploading the firmware available in parts, you only need to upload "BOOTIMG" and "ANDROID" (SYSTEM).
You may also need to flash "RECOVERY". Remember to uncheck the preloader. Here is a nice instructions file. (Link) (thanks Maxkir)
There is more info and firmwares to chose from at 4pda forum.
Update / Upgrade Procedure via USB flash drive:
Copy the zip file (do not extract) to usb drive or microSD card, (formatted by SD Card Formatter). Connect to usb port 1 or 2. Go to Car Settings, System info. Click Android Upgrade.
--OR--
Extract the zip into a folder named XYAUTOUPG into the flash drive or microSD card, connect to usb port 1 or 2 and then reboot. Upgrade should start automatically. You might need to try with different USB drives or sd cards. For some reason this only works with certain usb and cards.
MCU Upgrade Procedure via USB flash drive:
Extract the mcu file into flash drive or microSD card. Connect to usb port 1 or 2. Go into system info and update mcu.
Make a Full Backup/Memory Dump:
Open SPFlashtool, Select Memory Test Tab, Select only RAM Test (uncheck the rest), push start, and connect the unit. Save the information appeared, in a text file for later. (Read above "Memory dump procedure" for the usb connection setup).
Now go to ReadBack Tab, Double click on empty space next to tick mark, Select a folder where you want to store the dump file, and Type a name for the dump file you are going to creat, (ie. Boot_1, Boot_2, USER). Click Save. In next window "Readback block start address", select the region you want to make backup of (ie. EMMC_BOOT_1, EMMC_BOOT_2, EMMC_USER).
Start address is 0x0000000000000000
Length copy and paste from the text file you created earlier.
typically for Boot_1 and 2 the length is 0x0000000000400000
and for USER (16GB models) the length is 0x00000003a8000000
Click OK.
Now click on Readback and then connect the unit via usb cable. and Read process will start.
Do the same to make backup of all three partions. USER will take long time because its the largest partition.
RDS FM Radio:
Radio app with fixed RDS, channel names on buttons and HiFi: (Link) (thanks sjguk)
Copy to FMRadio directory, rename to FMRadio.apk and change permission 764. (or 755 ?).
Channel name Editor: (Link) (thanks mclaught)
install as normal. You may need to install GalaPublicResources. Click top right dots.
Multi Window Mode:
Go to root folder, look for build.prop. Open in text editor. Change the line ro.build.type=user to ro.build.type=userdebug.
If no such line is there, then simply add the line at the end. Save and exit. Go to Android settings, Developer options, look for multi window mode and enable it. Swipe down from the top of the window, Click on recent apps tile. You'll see the new multi window option there.
Subwoofer output Pin:
The default AUX_out pins are for mid range audio and is controlled by Mid slider in the mixer. The subwoofer output is on another pin (See Picture).
it is easy to remove one of the AUX_out pin and install it at the Sub output. this pin is controlled by Subw slider in the audio mixer.
Launchers UI1, UI2, UI4 (Link), UI5 (Link) (Thanks Maxkir)
Boot animation: (Resolution is 1024x600)
eg. (Link)
The animation preview didn't work for me, but I installed it anyway and it worked fine.
OBD Dongle Bluetooth Setting:
Open Bluetooth app, Click on settings, tap on the pin code "0000" and type in "1234" instead. Save settings.
Now search and connect the OBD dongle normally.
Unit Specs:
motherboard marking YT9217 VER1.5 XY AUTO also 9218 VER2.4 XY AUTO near the antenna
Model no 8227L_demo android 8.1
Android YT9217C_00005_V003_20191402_HIFI
Kernel 3.18.22
DDR 1GB FLASH 16GB
CPU A7 1.3GHzx4
Amplifier AC7315 mos bile duct 45Wx4
AutoChip ARM AC8227L
Mediatek MT6323LGA
Kingston EMMC 16G
The USB flash drive method didn't work for me, Device doesn't detect USB while booting up. I tried everything, connecting the test points, pushing reset button etc. to no avail.
SP flash tool does seem to work, I have tried uploading several available roms, only these three uploaded successfully,
full_8227L_demo-userdebug 6.0 MRA58K 1534513814 test-keys
Заводская прошивка под флештул от 09.11.2018 UI1 с переводом
20181224 TWRP ROOT перевод и эквалайзер от ноябрьской
but didn't turn on the device. Device turns on but I get a black (backlit) screen. What else is there to try?
Hi
Have a question.
Have 2din car stereo had Android 8.1 and update to Android 9 went bad.
IT Have Px30 rock chip 3326.
IT only goes in bootloop.
Have trid to install update.zip via sdcard and also usb, but get footer wrong.
Please if anyone know how i can get the plater UP and go Please tell me.
IT gas been factory reset and also deleted paratition.
alexanderjohansen67 at Gmail com
Beka2010
New member
Thanks everyone who contributed in my effort to fix my bricked device. Here is all that I have found useful in successfully reviving my device.
The files shared here are the ones that worked on my unit (see specs and pictures below) If your device is different, it may or may not work.
If the device has dedicated radio chip inside, the Firmware number will show as YT9218, if no radio chip, then it will show as YT9217
Note: if your device is not bricked, Make a full backup before trying another firmware.
Memory dump:
firmware 20181222 HiFi: (Link) (thanks mazepa2000) (May 2019 update below)
Rooted TWRP firmware 20190523 HiFi: (Link)
Preloader (Boot_1) from other Similar Firmwares: (Link)
Download the one similar to your device's version.
Firmware via flash tool: Rooted TWRP 20190523 (Link) Thanks Maxkir
(You may need to remap side touch buttons in Factory settings (code 8888) -> Touch settings -> Click start -> Name of the button -> The button itself ->Repeat for all the buttons -> close -> ok).
Firmware for YT9213 Device: (Link) (Thanks pajurpl)
Update / Upgrade Files USB flash drive:
Firmware 20190522 HiFi: (Link) (Thanks foxgiggle , iSevenAuto)
Firmware 20190906: (Link)
Memory Dump Procedure via flashtool:
(Memory dump is only needed if you need full recovery from a backup. Otherwise you may only need to do the next part.)
Download and install MTK drivers. (Link)
Load scatter file and preloader (Link) in spflashtool. Press Ctrl Alt V , then go to Window and select "write memory". In file path select "user", in begin address put 0x0, In Region select the partition named "EMMC_USER". Hit Write memory. After that plug in the usb cable (connected to usb1 port). If the device is not detected, you need to power it on. If still not detected then you might need to short the two test points (see picture) (without power this time) and then plug in the usb cable. Remove the short when write process starts. Check if the issue is fixed. If its not fixed, then do the same to write boot2 and boot1 partitions as well. You may need to download Boot_1 specific to your original firmware from the link above.
Uploading Firmware (full or parts) via flashtool:
If you are uploading the firmware available in parts, you only need to upload "BOOTIMG" and "ANDROID" (SYSTEM).
You may also need to flash "RECOVERY". Remember to uncheck the preloader. Here is a nice instructions file. (Link) (thanks Maxkir)
There is more info and firmwares to chose from at 4pda forum.
Update / Upgrade Procedure via USB flash drive:
Copy the zip file (do not extract) to usb drive or microSD card, (formatted by SD Card Formatter). Connect to usb port 1 or 2. Go to Car Settings, System info. Click Android Upgrade.
--OR--
Extract the zip into a folder named XYAUTOUPG into the flash drive or microSD card, connect to usb port 1 or 2 and then reboot. Upgrade should start automatically. You might need to try with different USB drives or sd cards. For some reason this only works with certain usb and cards.
MCU Upgrade Procedure via USB flash drive:
Extract the mcu file into flash drive or microSD card. Connect to usb port 1 or 2. Go into system info and update mcu.
Make a Full Backup/Memory Dump:
Open SPFlashtool, Select Memory Test Tab, Select only RAM Test (uncheck the rest), push start, and connect the unit. Save the information appeared, in a text file for later. (Read above "Memory dump procedure" for the usb connection setup).
Now go to ReadBack Tab, Double click on empty space next to tick mark, Select a folder where you want to store the dump file, and Type a name for the dump file you are going to creat, (ie. Boot_1, Boot_2, USER). Click Save. In next window "Readback block start address", select the region you want to make backup of (ie. EMMC_BOOT_1, EMMC_BOOT_2, EMMC_USER).
Start address is 0x0000000000000000
Length copy and paste from the text file you created earlier.
typically for Boot_1 and 2 the length is 0x0000000000400000
and for USER (16GB models) the length is 0x00000003a8000000
Click OK.
Now click on Readback and then connect the unit via usb cable. and Read process will start.
Do the same to make backup of all three partions. USER will take long time because its the largest partition.
RDS FM Radio:
Radio app with fixed RDS, channel names on buttons and HiFi: (Link) (thanks sjguk)
Copy to FMRadio directory, rename to FMRadio.apk and change permission 764. (or 755 ?).
Channel name Editor: (Link) (thanks mclaught)
install as normal. You may need to install GalaPublicResources. Click top right dots.
Multi Window Mode:
Go to root folder, look for build.prop. Open in text editor. Change the line ro.build.type=user to ro.build.type=userdebug.
If no such line is there, then simply add the line at the end. Save and exit. Go to Android settings, Developer options, look for multi window mode and enable it. Swipe down from the top of the window, Click on recent apps tile. You'll see the new multi window option there.
Subwoofer output Pin:
The default AUX_out pins are for mid range audio and is controlled by Mid slider in the mixer. The subwoofer output is on another pin (See Picture).
it is easy to remove one of the AUX_out pin and install it at the Sub output. this pin is controlled by Subw slider in the audio mixer.
Launchers UI1, UI2, UI4 (Link), UI5 (Link) (Thanks Maxkir)
Boot animation: (Resolution is 1024x600)
eg. (Link)
The animation preview didn't work for me, but I installed it anyway and it worked fine.
OBD Dongle Bluetooth Setting:
Open Bluetooth app, Click on settings, tap on the pin code "0000" and type in "1234" instead. Save settings.
Now search and connect the OBD dongle normally.
Unit Specs:
motherboard marking YT9217 VER1.5 XY AUTO also 9218 VER2.4 XY AUTO near the antenna
Model no 8227L_demo android 8.1
Android YT9217C_00005_V003_20191402_HIFI
Kernel 3.18.22
DDR 1GB FLASH 16GB
CPU A7 1.3GHzx4
Amplifier AC7315 mos bile duct 45Wx4
AutoChip ARM AC8227L
Mediatek MT6323LGA
Kingston EMMC 16G
hi
i need to know how u operate step by step
mine
yt9217c_00005_v002_20181109_hifi
android 8.1 go kenel 3.18.22
flash: 16g
mcu1: hw8227L-3.3-sw0-1.3
Читайте также: